
I know, I know. It is the middle of winter. And we’re about to see some snow in London. I came across a post that remained unpublished since a very hot week last year, after my last supper club for … Continue reading

I know, I know. It is the middle of winter. And we’re about to see some snow in London. I came across a post that remained unpublished since a very hot week last year, after my last supper club for … Continue reading

Happy new year!
Rushed off my feet as I was during Christmas week, I managed to squeeze in some time to eat as much panettone as I could manage. In between feedings, my days were divided as follows:

Back to the panettone, let me explain a festive routine we go through in this house. Every year, around the first week of December, I go Gennaro to stock up on their own brand panettone, before they run out. Gennaro is this Italian oasis of a shop in Lewisham, where you expect to bump into a 1950s Sofia Loren throwing tomatoes at you at any moment. It’s tiny, packed to the very last inch with food, permanently loud and busy. They make delicious panettone, just the right side of fluffy, fragrant and with the best crust I ever tasted. I keep a couple for us, and buy a few for presents. And around the 20th December, we run out and I run back to Gennaro begging for any cakes I can get my hands on, because what is Christmas without panettone?
For someone who gets so annoyed by picky eaters, I do have quite the nerve when it comes to panettone. I never grew out of my childish dislike of raisins and candied fruit. I know what you’re thinking: they do make fruitless panetonne, you know. Ah, but – and this is when even I get on my nerves! – I insist on a cake loaded with raisins, because… I like the taste they leave behind! Yes, God forbid someone picks the onions out of their meal. I will give them hell. But I go through a slice of panettone like a forensic investigator, removing every last bit of tiny fruit, and taking a good half hour to eat a single slice. Oh, how much it is worth it!

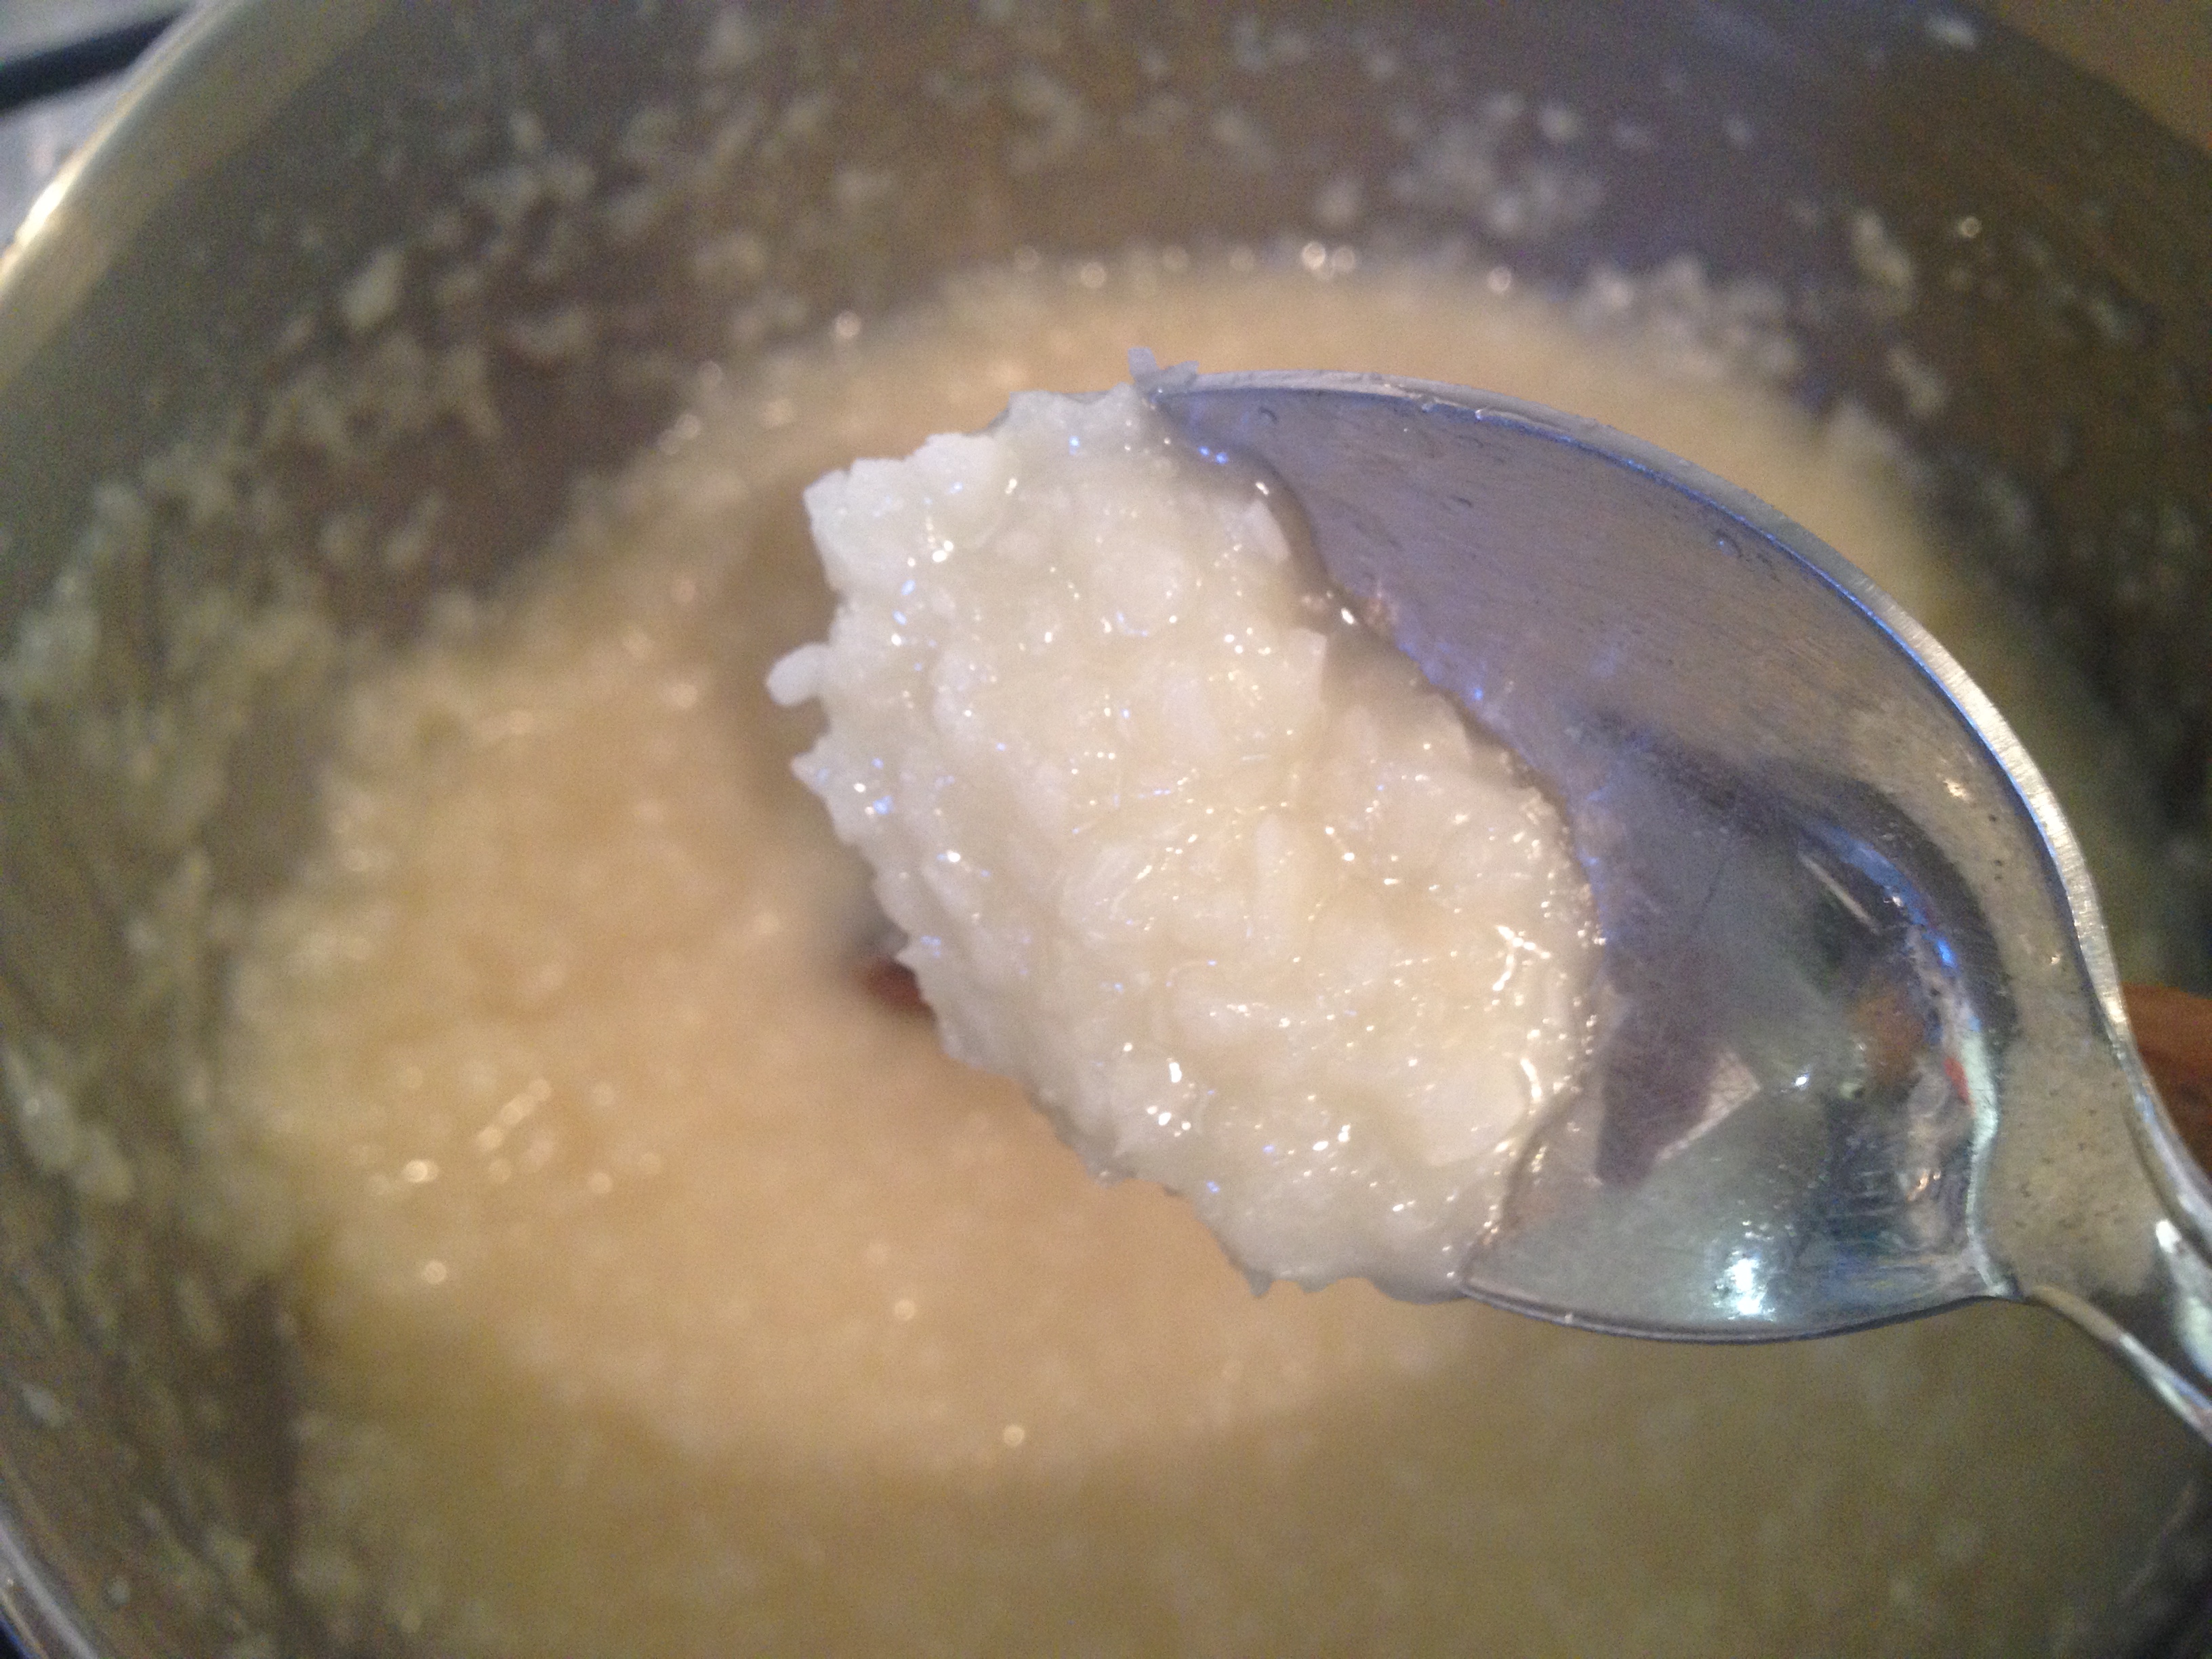
With the first week of January gone, I decided to admit defeat and accept we would not finish the last panettone. There was just under half of it left. Just as I was about to throw it in the bin, I remembered an old fashioned bread pudding I used to have as a kid. It’s one of those straight forward solutions to leftover bread. Which, like French toast or bread and butter pudding, tastes so much more special when made with fancy bread.

I put this in the oven this morning before starting work, and I’m afraid to say that half of it was wiped out for lunch. It’s just what you need to get you going on the dreary back-to-work rainy January: quick and easy, comforting caramely pudding.


Panettone Pudding:
I went through my ritual of removing all raisins and fruit from my cake before making this. If you want to keep the fruit in, I suggest you still remove them, prepare the pudding, and then add the fruit back again. If you just blend the whole thing together, the mashed up raisins will leave a bitter taste to the pudding. As for the tin, I used a round 20 cm (8 in) one. If you have a small bundt cake tin, it would make a very pretty pudding.
Pudding:
Caramel sauce:
Place a roasting tray half filled with water in the over. Switch it on to 180C.
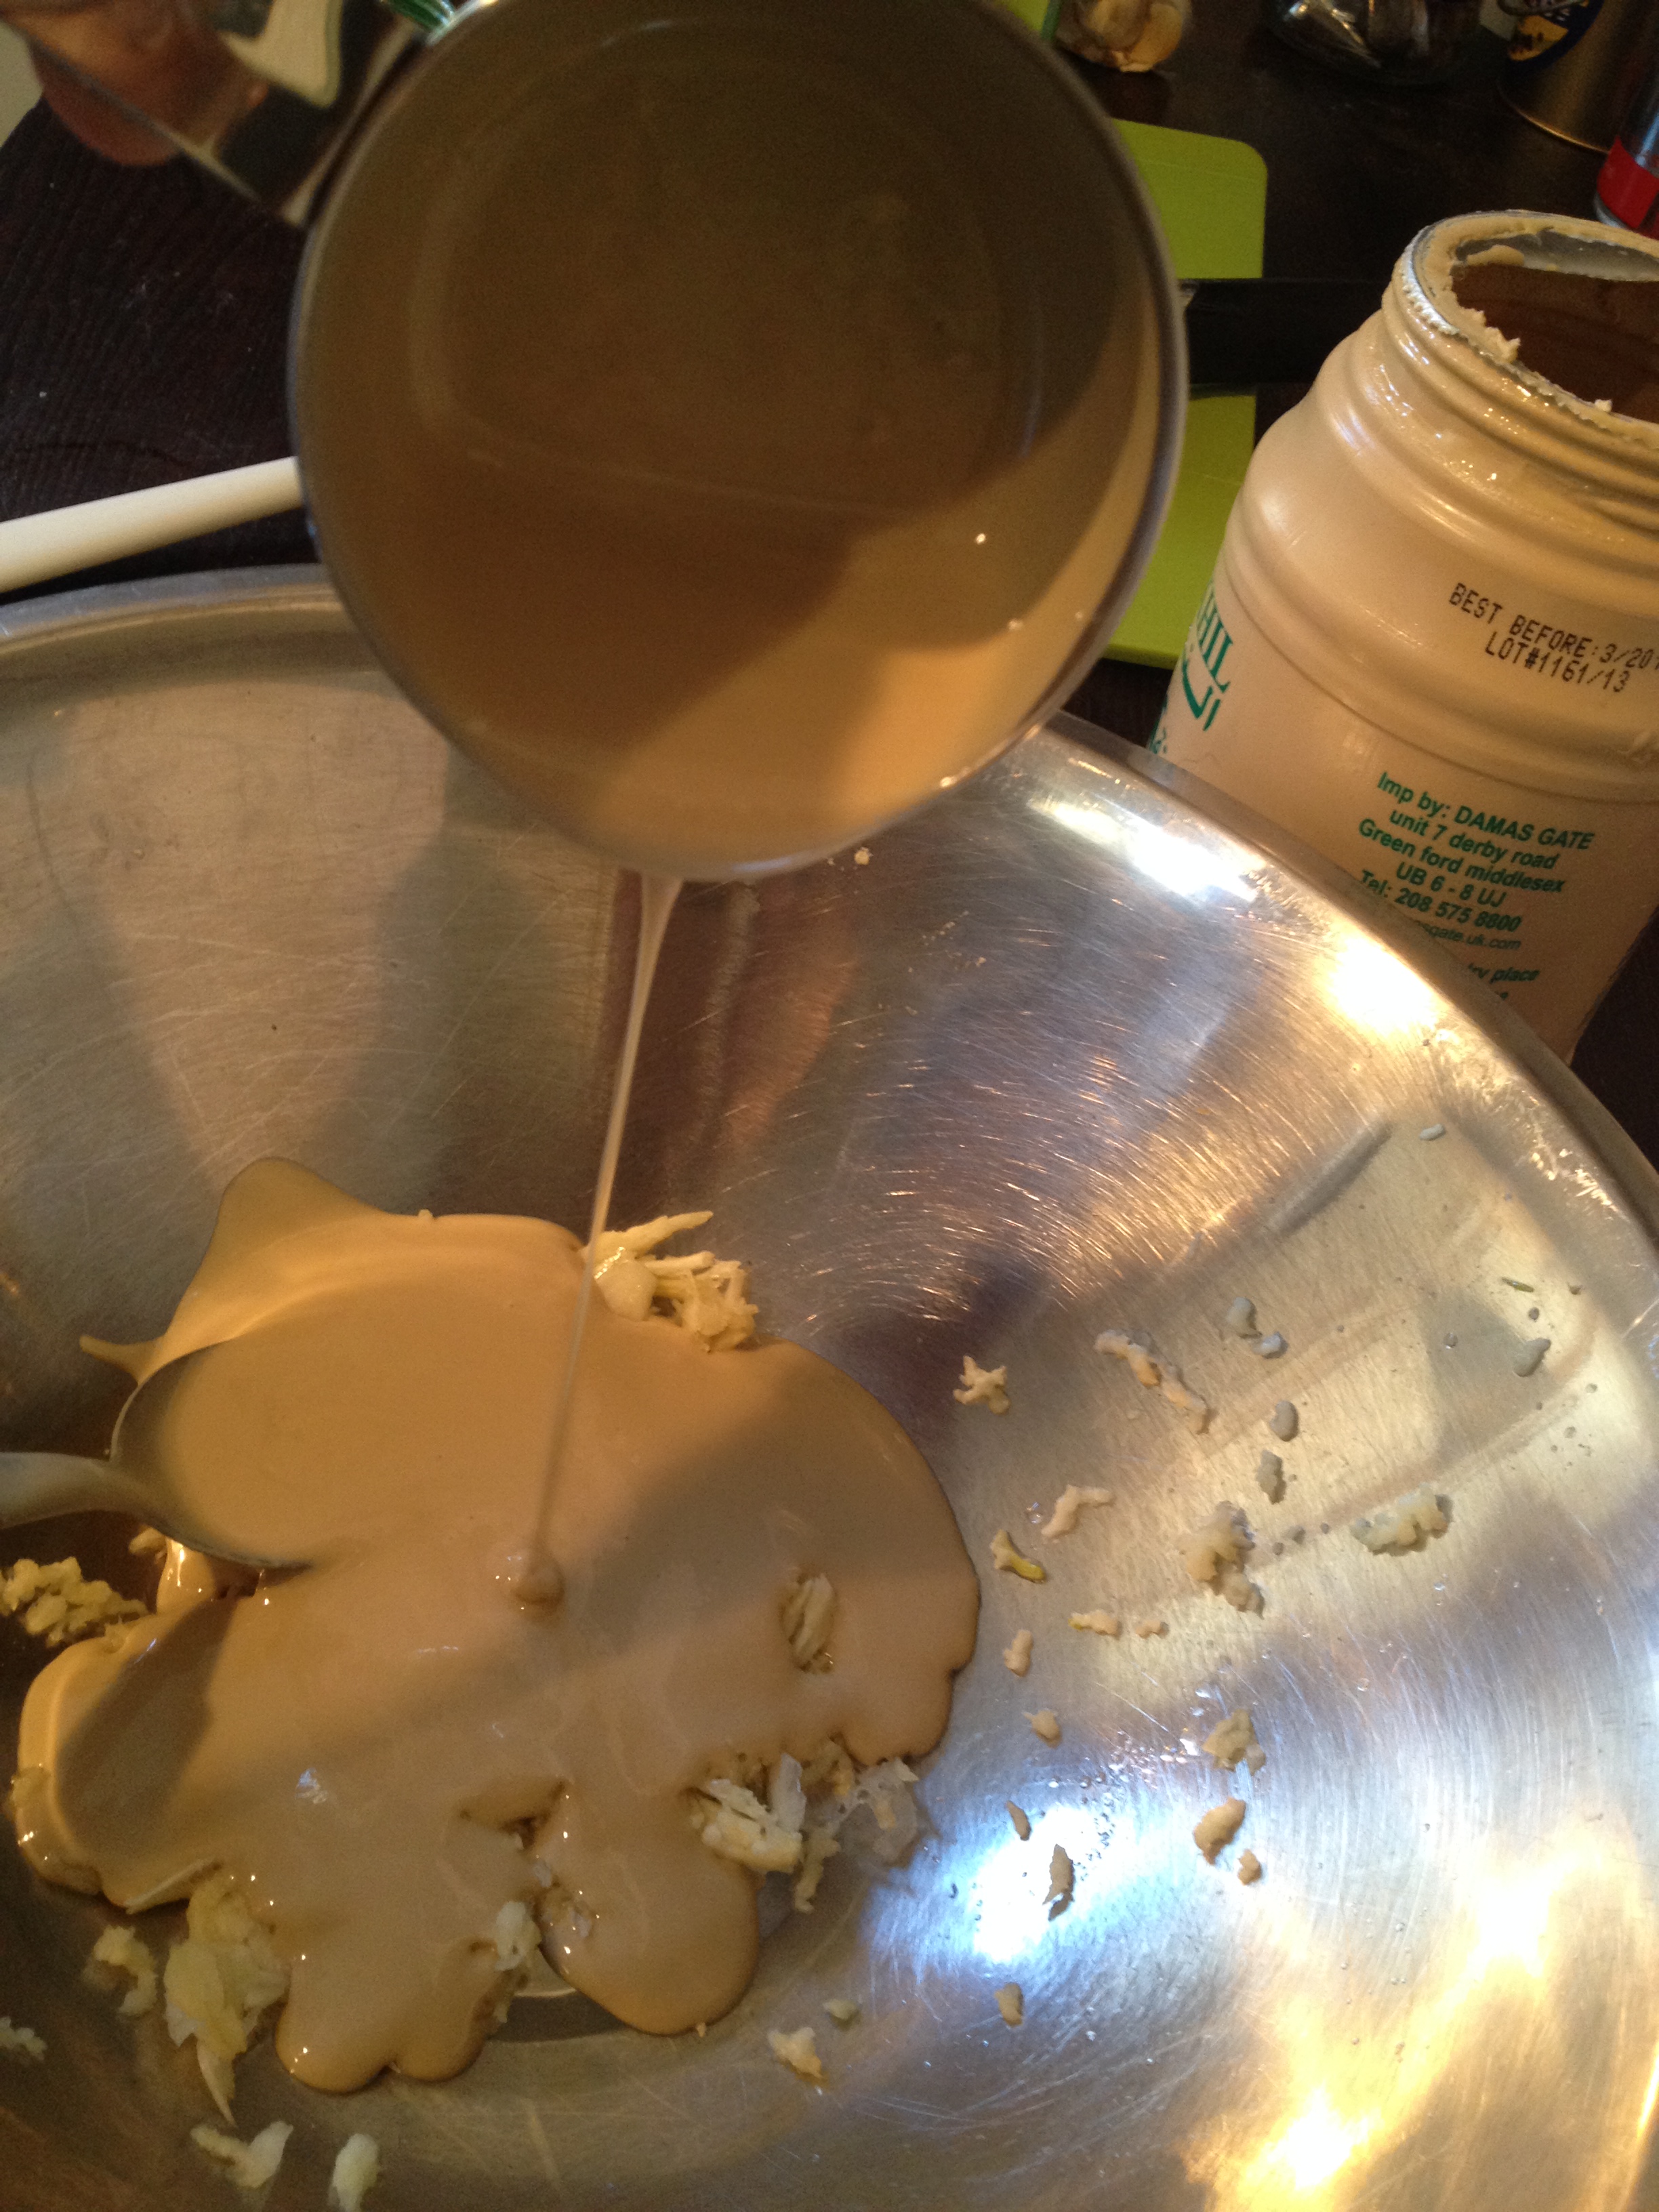
Make the sauce: in a heavy bottomed saucepan, melt the sugar on medium heat until you get a golden colour. Carefully add the hot water, and stand back as it will bubble furiously for a minute or so. Raise the heat to high and cook it until the sauce thickens a bit, stirring occasionally with a wooden spoon. This should take about 5 to 8 minutes, just so it’s thick enough to coat the back of a spoon.
Mix all the ingredients for the pudding in a blender until completely smooth. This is not a bitty dessert. It should be as smooth as – but denser than – a crème caramel.
Pour the hot sauce into a baking tin and tilt it so the sides of the tin are coated. You should still end up with a thick layer of liquid caramel at the bottom of the tin.
Pour the pudding mix over the caramel, taking care not to mix them. Carefully wrap the bottom of the tin in foil, and place it inside the roasting tray with water in the over. Cook it on the bagne-marie for about an hour – it should still be a bit wobbly.
Remove it from the oven, let it cool a little, and invert the pudding onto a serving plate while still warm. Let all the caramel drip over the pudding.
Serving suggestion: have a warm slice immediately, then place the pudding in the fridge and eat the rest of it when it’s completely cold.


We have little shops selling fresh ricotta, lovely neighbours with generous cherry trees, and we are a safe distance away from chaotic central London. These are some of the many reasons why South East London rocks.

Like most people living in London for more than 5 minutes, I have it as a rule to avoid Oxford Street and its noisy crowds, dreadful traffic, visual pollution and generally irritating surroundings. During the Summer months, that rule becomes an amber alert, taking into consideration the tourist population, and my pathological lack of patience with slow pedestrians hogging the pavement. Last Saturday, I had to make an exception for a very good reason: a new Kitchenaid! My mum decided she wanted to buy me one, and as the good daughter that I am, I gratefully accepted it. Selfridges had a sale on, and seemed to offer the best price, and so I headed to the more salubrious end of Oxford Street to see those babies in person and be sure to pick the right colour. Of course I had forgotten it was Pride Parade day, the traffic was twice as bad, half of Oxford street was closed off even for pedestrians, and it took me two hot, sweaty, sweary, nervy hours to emerge at the other end and smell the sweet air of Selfridges. Feeling immediately soothed by the kitchen department, I decided I could still do with a glass of something and some slices of San Danielle ham, and another glass of something else … well, before I knew it, I was cutting it short to make it back for the Brazil match.


Which is why, in my rush, I nearly missed the 1950s moment happening right on my doorstep as I rushed back home (through a much smarter and faster route, caring a bit less anyway after my hefty aperetif session).
Who doesn’t love a lemonade stall sort of enterprise? A bunch of kids selling the produce of their garden cherry tree, a pound a bag. Their mums were overseeing the operations, chatting away to neighbours. Total food miles: zero.

I quickly started on a bag, but had to stop myself choking on a pit, as I screamed and pleaded with Brazil to get a move on as we hung to the world cup by the skin of our teeth.

Next day, my cherry project took shape as I was buying some ricotta for dinner. I could eat ricotta for days on end, and the same goes for Greek yogurt. I was looking at both of them in the shop, and wondered what frozen yogurt would taste like if I mixed some ricotta into it. And than added a ripple of cherry jam.
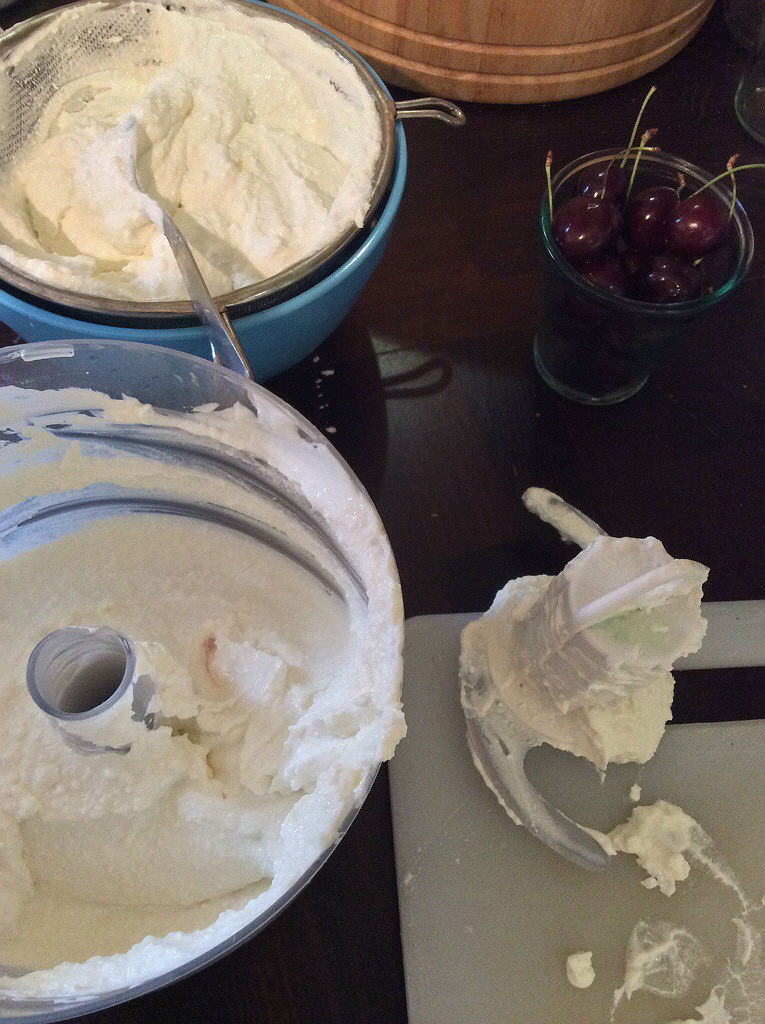
Let me tell you what happens: you end up with creamy, rich frozen yogurt, with juicy bits of thick sticky cherry running through it. I found some creme de cassis and added to the cherry jam. I’m not entirely sure how child friendly this makes my frozen yogurt, but I took some back to the cherry mums, and they seem happy enough with it.

Three cheers to Catford and our cherry trees!

Cherry ripple ricotta frozen yogurt
Cherries will forever taste foreign and northern-hemisphery to me. As for frozen yogurt, they may be a bit 90s, but I never got over them. What’s not to like? Fatty yogurt, turned into ice cream? The creme de cassis completes the nostalgic 90s theme.
For the cherry jam:
For the ice cream:
Make the jam:
Pit and roughly chop the cherries.
In a heavy saucepan, add the cherries and the rest of the ingrdients, bring it to a boil, and let it cook in medium heat for about 30 minutes until you have a thickish jam. Let it cool completely.
Make the frozen yogurt:
In a blender, blitz all the ingredients until smooth.
Press the yogurt – ricotta mix through a sieve so it’s not too bitty.
If you have an ice cream maker, follow the manufacturer’s instructions from here.
I don’t have one (mother?), and here’s what I’ve done:
Place the mixture into a non metallic container and take it, uncovered, to the freezer. Leave it an hour and mix it with a fork, making sure there are no crystallised bits. Mix it again an hour later. Wait one more hour, and this time add the cooled jam to it and mix it as much or as little as you like. I made mine reasonably pink, but still left it a bit streaky. Leave it in the freezer for another hour, and it’s ready to serve. If you leave it overnight, remove it from the freezer about 30 minutes before serving. It should be creamy, but not melting.

I was sipping a dubious cappuccino on the train to work last Tuesday when this landed in my inbox: “Hi, Renata, this is Anna. How would you like to come over and cook with Rachel Khoo words words words words recipes from her new show words words photos for your blog some more words and noise sit down for dinner?
At least these were the keywords that jumped up right in from of me before I rushed to hammer my reply:
“Dear Anna. Hell, yeah!”
And then I carried on with my day, told approximately 250 people I’d be hanging out with Ms Khoo, and eventually went back to the email, which is when I spotted some additional words that I swear were not part of the original text I’d seen that morning: the whole thing would be filmed and released in time for Rachel Khoo’s new cooking show on UK Good Food Channel this month. You see, I dislike cameras. They dislike me. It’s just not happening for me and cameras. I tend to freeze, panic and babble incoherently every time one of those intrusive weapons points at me.
After much fretting, the eternally wise Vegetarian Spouse reminded me to get a grip, get over myself and get on with it. Yet again, I am glad I listened to him. I got to meet a bunch of talented bloggers, had a great time cooking, and found out about Rachel Khoo’s favourite secret places in Paris.
When Rachel Khoo first appeared on people’s radar a few years ago with her Little Paris Kitchen show on BBC2, the tale of a Londoner feeding Parisians on their own turf was quickly snatched up as a great success story. What I really like about her is that she is a complete self-starter. She went and set herself up as a pastry chef in Paris, used the tiny space in her flat to run her petit supper club, pitched her books to publishers and knocked on producers doors with her idea until she got a deal. She is vocal about the rotten deal female chefs get from television producers. She has a point. Looking at the very Good Food Channel page, hosts of Khoo’s 2 new shows Kitchen Notebook: London and Cosmopolitan Cook (the rest of Europe), a gallery of 17 celebrity chefs has room for 6 women only.

On the Cook With Bloggers evening, my nerves were immediately soothed as I arrived: a couple of lovely smiles greeted me, and the words green room and prosecco uttered within 2 seconds of arrival. Here’s some of the highlights:
What did we cook? A couple of recipes from Khoo’s new Kitchen Notebook show, none of which I had considered making before – again, a reminder of why it is important to give new opportunities a go. Khoo’s maternal side of the family is Austrian, and it is clear she’s been influenced by her grandmother’s cooking – and love of butter, a feature I identify so well with, my own Piedmontese nonna’s cuisine consisting of butter, garlic, and double cream. We tried our hands at Austrian Spatzle – pasta dumplings which I had thought was German – and Swedish Smorgastarta.

The gossip: What’s Rachel Khoo like? Engaging, smart, funny, patient, really nice. And she clearly has control over her career. She talked passionately about what she enjoys in food, in television, and what she felt made a perfect restaurant (it was: homely food and a remote location).

Dinner with other bloggers to taste the food we had cooked together was fun and loud, and very social. We all had our own questions for Khoo, but it was also a lot of fun to meet the real life versions of people I follow on Twitter, and for once not having to limit communication to 140 characters. The eater behind The Food Urchin blog has what can be described as a healthy appetite (very impressive progress on the smorgastarta, well done!), and I enjoyed cooking next to Leyla of The Cutlery Chronicles because once in my life I was the least distracted one! She is also very funny. The spatzle was, quite simply, a delicious dish. I won’t spoil it by sharing the recipe before the show is out. For this blog post, however, I have made an adapted bite sized version of the Swedish smorgastarta we cooked there. With massive apologies to Swedish people reading this, since I used oat cakes in place of Swedish flatbread. Consider it an homage to a Scandinavian classic.

The next time I go to Paris, I can’t wait to visit Rachel Khoo’s secret little Vietnamese restaurant, complete with local ladies coming in and out of a trap door on the floor, hopefully to fetch me a tray of complimentary sweets.
Rachel Khoo’s Kitchen Notebook: London starts tonight on the Good Food Channel at 9 p.m.
I attended this event as a guest of the Good Food Channel. I was not required to write a positive review, and the opinions I have expressed are my own.

Oat Cakes Smorgastarta
Smorgastarta is a Scandinavian dish, somewhere between a large sandwich and a pie. I have made mine into individual starter portions, and have used oat cakes in place of the more commonly used rye bread or Swedish flatbread. Yes, oat cakes are drier, but I love them, and it gives me the perfect excuse to use twice as much cream and filling. It requires very little effort, but some planning ahead, mainly to coll down the brine to cure your salmon.
For 2 starter portions:
Ingredients:
Prepare a brine to light cure the salmon:
Fill a small saucepan with 250 ml water, add the peppercorns, juniper berries, sugar and salt.
Peel 1 raw beetroot, chop it up and add it to the water. Bring it to the boil and let it cook in medium heat for a minute or two.Transfer it to the fridge and let it cool down completely. If too warm, you risk cooking the salmon in the water.
Prepare the filling and toppings:
Cook the other beetroot in water and leave it to cool. When cool, peel and slice or dice the beetroot. I sliced it thinly with a mandolin so it matched the salmon looks.
Using a sharp knife, mandolin or vegetable slicer, cut ling thin slices of cucumber. Depending on the length, you will need about 4 slices for 2 cakes.
If you have a tiny melon baller, cut out little cucumber ‘pearls’, about a handful per cake. I used the smallest (1/8 tsp) measuring spoon I had to do this.
Take the piece of salmon and slice it thinly. Allow 3 to 4 slices per cake. Add the slices to the bowl of cool brine and let it cure for at least 15 minutes.
Blitz the remaining salmon and sour cream in a food processor. Add salt and pepper to taste, and add more sour cream if needed. You need it to be not too runny so it stays put in between layers of oat cakes.
Whip the double cream until firm. Add a teaspoon of horseradish, and about 3 tablespoons of sour cream to it. Aim for a firm enough frosting.
Assemble the cakes:
Make a 3 layer sandwich with the oat cakes and creams: one oat cake – a good layer of sour cream-salmon mix – oat cake – sour cream-salmon – oat cake. Top it up with the double cream-sour cream mix. Frost the side of the cakes with the double cream-sour cream mixture.
Wrap the sides of the cake with the cucumber slices.
Top it up:
Arrange a few slices of salmon, the cooked beetroot, cucumber pearls and herbs on top of the cake.
Serve as a starter with a watercress salad.

The term peasant food can be overused, and is often an affectation to evoke a bygone era of happy working folk eating simple, nutritious food that has cleverly been discovered as a culinary treasure. Peasant and food put together tends to annoy me a lot. It just feels fake.
And yet these rice fritters, which invariably gain a devoted crowd when I serve them, are genuinely the stuff of everyday lunch in Brazilian homes – peasant or not.
Brazilians, like most Latin Americans, eat A Lot of rice and beans. It really is everywhere, every day, at every meal. It’s no surprise crafty cooks would have found ways to use leftovers of both – bean soup and bean broth being other frequent presence on end-of-week dinners.


As a pre-starter choice in the supper club, these fritters are a complete sell out. If you want to really look the part, call them Bolinho de Arroz and start making those caipirinhas.
You’ll find all sorts of variations of this recipe, most with plain flour, and some debate on whether or not to add milk to the mix. I like to use breadcrumbs in place of plain flour, and no milk. This ensures a crispy first bite, and a soft inside, free from sogginess or oil.

As for the rice, use whatever next day rice you happen to have lying around. The only exception is risotto. The Italians have perfected their arancini, and it’s a good idea to save your leftover risotto for that. It won’t work so well in this recipe. American long grain, basmati, white, jasmine, it’s all fine. Next time you over order on your Indian takeaway, save the rice for this.
At the Eurovision supper club earlier this month, I made mejadra, a dish of white rice, lentils and onions to share. It went down very well, but we still brought some back home. This is what I used here. Rice and lentils, plenty of spices, quite a lot of onions. Once fried, I made a couple of dips to go with it: a sort of salsa verde with coriander, anchovies and lime, and a yoghurt sauce. Since I’m currently going through the phase of adding dukkah to everything I eat, a sprinkle of that on the rice cakes gave a very welcome final touch. I was given a jar of this spice and nuts mix by a friend who’s gone up several points in my good books since. I suspect there will be many variations of this North African mix. So far, I could detect cumin, semame seeds, oregano and chickpeas in mine.

The plan was to make a large batch of them and freeze some. That didn’t happen. The freezer is looking quite empty and desolate at the moment.


If you have any Turkish or middle eastern shops near you, it’s worth looking for labneh, which is a strained yoghurt, of thick consistency and quite sharp taste. Failing that, greek yoghurt works too, although it is more mild and sweet, and I’d add some lemon or lemon to it for tartness.
Rice fritters
(if you’re making rice especially for this recipe: prepare the rice one full day ahead and follow the instructions at the bottom of this recipe*)
Dips:
1. Yoghurt: mix labnheh or preferred yoghurt with chopped parsley, one crushed clove of garlic, salt, pepper and a squeeze of lime.
2. green sauce: chop 3 handfuls of coriander, leaves and stem. Mix it in a small bowl with 4 – 5 crushed salted anchovies fillets, plenty of olive oil, a squeeze of lime, salt, pepper, and 1/2 small red chilli, chopped.
*If you’re making rice especially for this recipe:


This is a tale of redemption. The lesson here is: when life gives you chocolate and coconut, put them together. Because it’s a match made in sweet heaven.
I started last week with a clear image of a happy Easter egg assembly line in my kitchen. My plan was a simple one, and seemingly a winner: home made Easter eggs made of two thin layers of milk chocolate, and a creamy coconut paste in between them. An Easter egg Bounty bar, if you will.


And then a succession of failures ensued. The picture inside my head was quickly shot down by reality. The pile of coconuts I had planned to grate yielded a bunch of dried, brown, foul smelling pulp that went straight to the bin. And Easter egg moulds proved to be the most difficult kitchen item to procure in the history of the world. By the time I resigned myself to the fact that no shop in the UK was prepared to sell me chocolate moulds – they’re either discontinued, or require a purchase no later than Christmas to guarantee delivery by Easter – I had a large bowl of delicious creamy coconout in my hands. Yes, because shredded coconut made an excellent alternative to the fresh stuff.

And so I finally let go of the original Easter egg idea, and instead had an enormous amount of fun melting chocolate and turning them into coconut-chocolate bars. This was not the fancy, exclusive chocolatier boutique sort of bar. Yes, they taste moreish and delicious. But they look far from perfect and pristine, and since it is Easter, I decided to dress them in not exactly the most elegant or sober packaging. After all, Easter eggs are like chocolate in drag. I made mine into small morsels and wrapped them in colourful tissue tied up with ribbon. And I am now sitting here praying the weather will hold, as there are dozens of these things spread around the garden, ready for tomorrow’s Easter egg hunt.
Happy Easter!

Post-Easter update: the chocolate disappeared in record time. I thoroughly recommend this if you’re looking for an instant crowd pleaser.


Chocolate coconut bites
The first step in this recipe should read: Move to a tropical country. Sadly, the coconuts I managed to find in London were no good. The alternative was very good, and I ended up with a moist coconut paste that carried a lot of flavour. If possible, look for packets of flaked, instead of dessicated coconut. There’s more moisture and flavour in them. I then shredded them finely in a food processor. The coconut paste is incredibly tasty on its own, and I’d advise you to make a little extra, as several spoonfuls seemed to mysteriously disappear in the making of this.
As for the chocolate, I went for milk, as the kids I was making this to prefer it. I like Green&Black’s for an easily available, reasonably priced, good quality chocolate. Choose the chocolate you prefer, and go for a really fancy one for a treat – and if you’re not feeding a bunch of famished kids!
makes about 50
Make the coconut paste:
Put the coconut (fresh or flaked) into a food processor and shred it finely.
Mix shredded coconut, milk and sugar in a medium sized, heavy bottomed saucepan, and bring it to the boil. Continue to cook on medium heat for 20 to 25 minutes, stirring occasionally. Do not let it burn. It is ready when you can easily see the bottom of the pan as you stir it. You should end up with a thick porridge that doesn’t fall off the spoon as you turn it. Let it cool completely before using it.
Melting the chocolate: If you’ve never made chocolate, this step-by-step guide from the BBC Good Food pages is excellent. If you don’t have a kitchen thermometer, here’s a rough guide that will work well in this recipe:
Assembling the chocolate-coconut bites:
Grease your hands a little with butter. Take about a full teaspoon of coconut paste into your hands and roll it. Dip the coconut ball into the chocolate to coat it well, pick it up with a fork and let the excess fall into the bowl, then rest the final product on a sheet of parchment paper. Let it cook completely, ideally for a few hours until it has dried up well.
Wrap it up: I used a layer of foil for direct contact with the chocolate, and then wrapped tissue paper around the foil.


I have no idea what happened to winter.
All I know is that, after what felt like a decade of continuous rain, all of a sudden there are flimsy dresses in the streets – it is England after all and people get carried away with a bit if sunshine.
With this year’s early onset of spring came an array of fresh vegetables we hadn’t seen for a while, and a craving for all things fresh. True, radishes are still looking a bit anaemic, and the stars of the show – strawberries, sweetcorn, peaches – haven’t shown up yet. Still, with the glorious sunshiny weekend we had, it was out with the melted cheese and in with the gin & tonic lemonade and salads.

Craving to cook something fresh and summery, I went for a stroll through Lewisham market in search of inspiration for dinner. Lewisham market is a curious place. Compared to its more genteel farmers’ markets neighbours, it could be described as ‘real’. It’s a great place to fill your fridge for the week for a fiver. As long as you’re planning to do some serious cooking. Some of the typical fare on offer include: a pound for 900 spring onions, or a bucket load of lemons, or approximately a lifetime’s supply of coriander. Don’t ask me how it’s all so incredibly cheap, but you do end up with some meal planning challenges. I tend to go with one of my neighbours, and we split the massive amounts of vegetables, or we’ll end up eating onion soup for a fortnight.

On Saturday, I went a bit overboard on the aubergine, which really is a lovely problem to have. There isn’t a single variation of this most versatile vegetable that I don’t absolutely love. Parmiggiana, caponata, battered aubergine, I’ll lap it all up. The undisputed king of aubergine dishes, for me, has to be baba ganoush – the smoked aubergine cream also known as one of the top 10 best dishes in the planet. So, with 2 and a half tons of aubergines on my hands, I set to roast those babies and stock up on dip.

Baba ganoush is so simple to make, but it can be a bit off-putting because it looks fiddly and messy. It doesn’t have to be. Just have a very basic production line and you’ll have smokey, irresistible aubergine that goes wonderfully well with virtually every food – and a relatively tidy kitchen in the process. All you need is a few aubergines, some tahini – or sesame seed paste, widely available from middle eastern food shops or most supermarkets – , garlic, lemons and olive oil. As for herbs and spices, I’ve experimented a lot, and found I like to add more parsley than you’d normally see in original recipes, which explains why my baba ganoush looks a bit green. I also add a tiny pinch of cumin for the smokiness, but I suspect if you roast your aubergines on a barbecue (which I don’t – please refer to paragraph one: living in London), you wouldn’t need the cumin.
For a quick dinner, you can use the 30 minutes while the aubergines are in the oven to get on with the rest of the meal. I used my Lewisham market bounty to make some roast cauliflower salad with lots of raddishes and a few of the 900 spring onions. Some grilled halloumi cheese, a bit of hummus to pair up with the baba ganoush, and we were set for spring!

Johnny the cat is quite partial to a bit of babaganoush

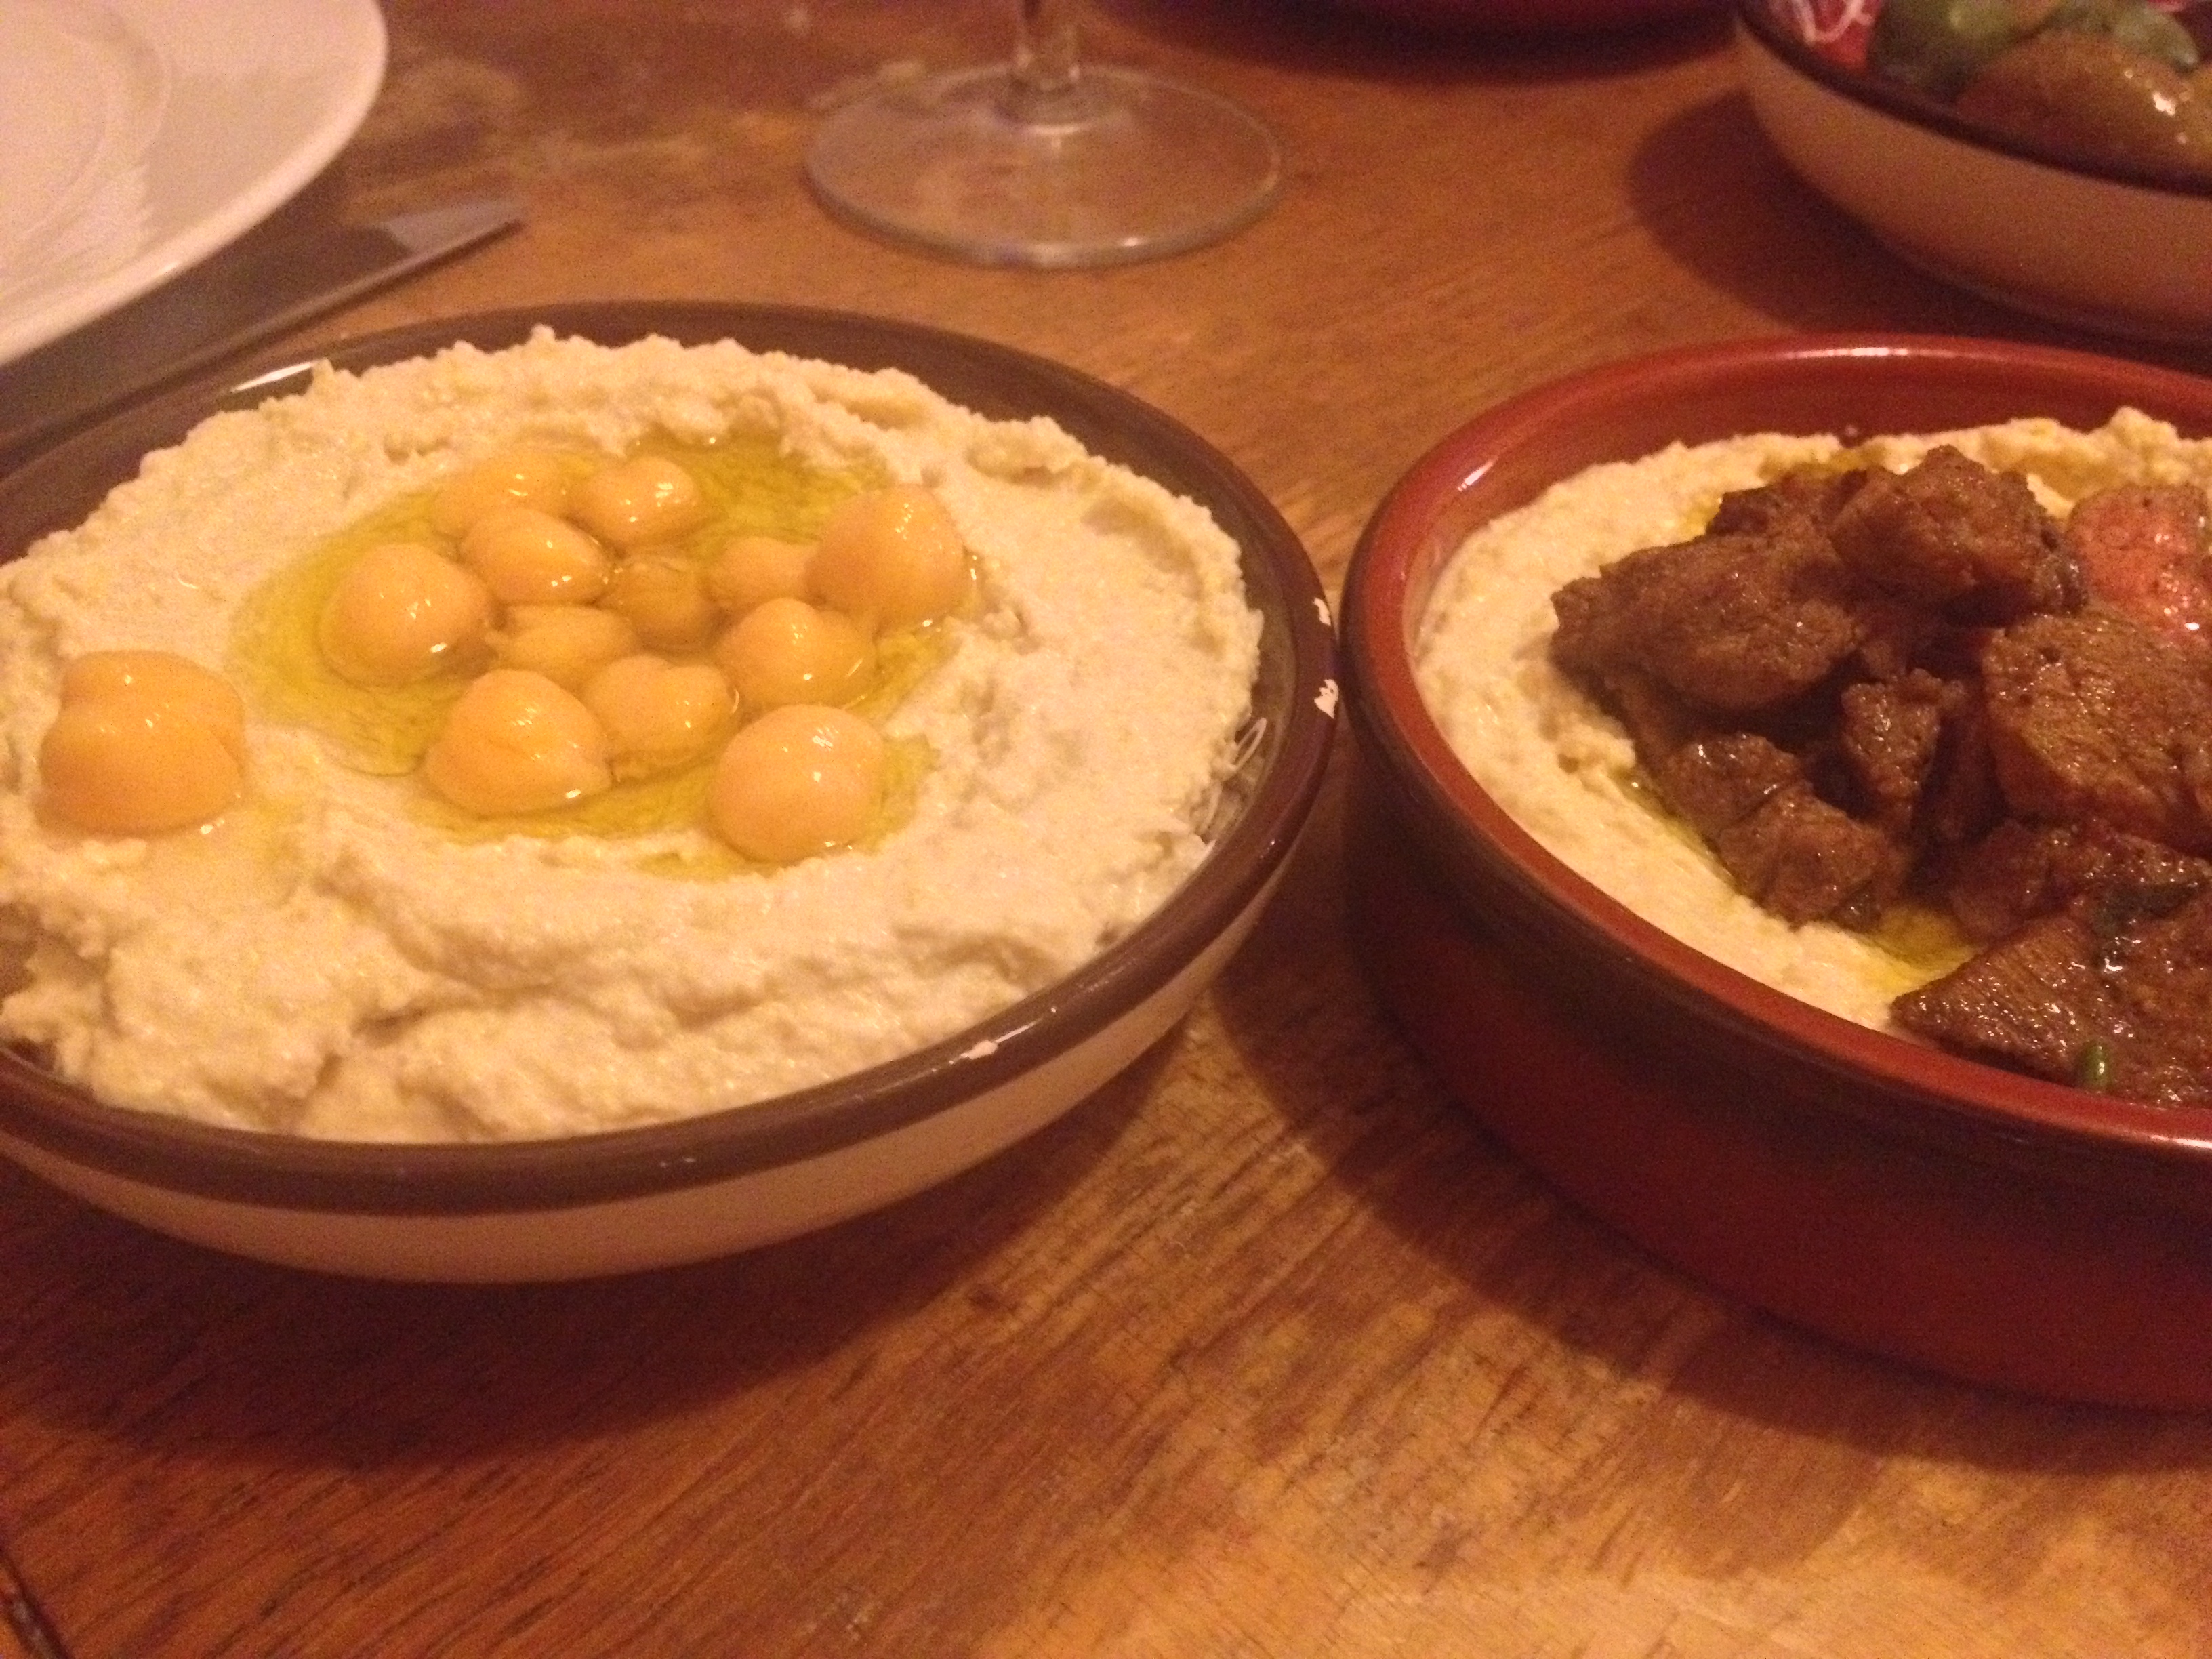
His and hers hummus: mine has marinated neck of lamb on it.


Baba Ganoush
This recipe uses quite a lot of parsley and the dip ends up pretty green. Use a bit less for a more authentic looking brownish baba ganoush. As for the garlic, I use a small one per large aubergine. It’s safer to start with 1 or less, and add more if needed. Too much garlic will ruin the aubergine taste. If you don’t have a gas fire, I think the only worthy alternative is a barbecue. Or a wood fired oven if you’re lucky enough to have one. Taking the aubergines straight into the oven without smoking them first, in my opinion, compromises the final taste too much and it’s not worth making it.

They say the first step to beat addiction is to admit you have a problem. So here it goes. I seem to be out of control on the following:
Unfortunately, it is too late to save me from avos. Besides, I am simply not ready to part with them. As for the over-reliance on smoked paprika, and the incessant checking of food news online, there may be a way out. Just not today. Maybe talking about it will help. Today, I came across this piece on meals for one: what chefs and foodies cook when they’re dining al solo. It was before lunch, and I had been trapped in an interminable conference call for approximately 45 hours, which is just what that sort of story is designed for. To wake up your mind and soul, and bring you back from near-coma situations. As I laid eyes on a lazy dish of chicken thighs, I knew I had found dinner.


It’s not often that I prepare slow cooking, all-in-one dishes. It’s probably because I tend to get distracted quickly, or the knowledge that leaving a pot to cook for 5 hours would probably mean forgetting about it altogether and returning to a house fire. The dish favoured by Belleau Kitchen posed no such threats, since it takes less than 2 hours, and it didn’t look like I was going anywhere for the rest of the day, seeing the way my call was going.

I made a few adjustments to fit what I had at home, and also the picture I had in my mind of smoky paprika chicken. I can’t explain the sudden paprika love. I don’t think I ever used this ingredient before last year, when I was given a small tin of it to try, and never looked back. I mainly use it to add a meaty taste to vegetarian dishes, but this time it was time to try it on flesh!

If I had to pick a recipe that is virtually impossible to mess up, this would be the one. You don’t even add oil to it. The fat on the chicken skin does the job for you. Just pile up layers of chopped vegetables and chicken, thrown in some wine (general rule in life) close the pot and abandon it to its own devices in the oven for a couple of hours. If you’re looking for a good cause for your fancy Le Creuset, this is your chance. I don’t have one – they always seem to cost the equivalent of half my holiday budget for the year. In fact, I have no idea how the pot in these photos ever found its way into my kitchen. I spotted it one day in the cellar, and suspect someone is looking for it as we speak. Too late now, as I finally saw the point of cooking with one of these babies, and it will be staying.


Chicken Thigh Casserole
for 4 people and a medium sized casserole dish: 25 cm (10 in)
This is slightly adapted from the original recipe, with a smaller dish and longer cooking time.
Preheat the oven to 200C (390F).
Chop all the vegetables: the onions quite roughly, the garlic thinly, and the rest into 2 cm (just under 1 in) pieces.
Mix all the chopped vegetables together at the bottom of your casserole dish. Add herbs, paprika, salt and pepper, and mix.
Arrange the chicken pieces on top of the vegetables, tuck in the lemon quarters in between then, sprinkle some more salt, pepper and herbs, and pour the wine over the lot.
Close the dish with the lid and take it to the oven for 1 hour.
Remove the lid, and let it cook for another 20- 30 minutes, or a bit more if needed. Check that the skin is crispy and the chicken done before serving.

Children’s parties can be loud things. The ones I attended when I was growing up in Brazil were insane. Brazilians have a very sweet tooth. Very. We don’t go much for the hint, or suggestion of sugar in our desserts. We go the full hog. Back in the 70s, with not a lot of thought given to ADD or E numbers, there was nothing standing between a birthday table covered in glucose and a pack of 7 year olds. The result was a bunch of crazed kids buzzing around in a collective sugar rush for hours, until the first inevitable crash came knocking down everyone else like dominoes. And we all went home sobbing and a bit bruised, ready for the next birthday do.
One of the many treats I stuffed my face with in those parties was Maria-Mole. They’re not quite marshmallows, since there are no eggs in them, but it’s a similar texture, a little bit lighter, and covered in coconut. If you’re thinking of turkish delight, forget it. These are much more delicate, a bit more bouncy, and not chewy or sticky. Before you know it, an entire tray of maria mole can go in 2 minutes. They’re the very definition of moreish.
In the true spirit of the 70s, you’ll find maria-mole in various pink colouring shades, or coated in a thin film of chocolate, or sometimes sprinkled with toasted peanuts. I suspect the ones I had as a kid were out of a pre-mixed packet, with synthetic coconut flavouring. I like the white, unadulterated coconut version, and made my own here, dispensing with the help of Dr Oetker. You could use fresh coconut milk if you’re lucky enough to have them handy. I used coconut milk out of a tin.


And it worked a treat. Imagine biting into a coconut cloud. Made like this, maria-mole are definitely not a sickly children’s treat, and would make a very proud and grown-up appearance at any table. I served mine with coffee after Sunday lunch, and I wish I had some kids to blame for the mysterious disappearance of all maria-mole by the time I went to bed. With a slight ringing in my ears.

Coconut marshmallows
(Maria-Mole)

Ah, the lure of the thrifty eating!
I suspect I’m not alone in deriving an enormous amount of pleasure from building an entire meal out of leftovers. I’m reasonably sure I’ve lived through some serious famine in a previous life. My inability to throw food away, often verging on borderline petri dish territory, may also have its roots in my upbringing: how my mother loved to repeat the mantra of ‘you never lived through a war!’. Now, there are so many holes in that statement, it’s difficult to see where to start, really. Let’s see. My mother is a product of post-war Italy, and left for a better life in the tropics as a young child. And I also happen to have met her own mother, who’s capable of spending hours on end over a stove to make sure everyone gets exactly what they want to eat. The notion of a starved childhood fighting for scraps of polenta and sheltering from snow tempests is one she clearly only knows from the melodramatic Italian children’s literature that she herself read to me! In any case, the concept stuck and I don’t like throwing food away. To the extend that I will find myself in an endless cycle of buying a bit of feta just to fit in with that pie made of scraps, but then end up with leftover cheese and buy something else to go with it, and I’m forever trapped.

Going from mothers to husbands, mine is vegetarian, and, as much as I care for the man, that sort of behaviour can be a challenge on occasion. Currently, having a freezer stuffed with 2 pork loins, a kilo of tilapias and some packs of bacon even I could not manage on my own, it is tempting to smuggle some animal protein in a veggie curry and get it over with. Last night, I decided to tackle the fridge, abandoned after a week away with work, and crying out for some clearing out. This is what I made:
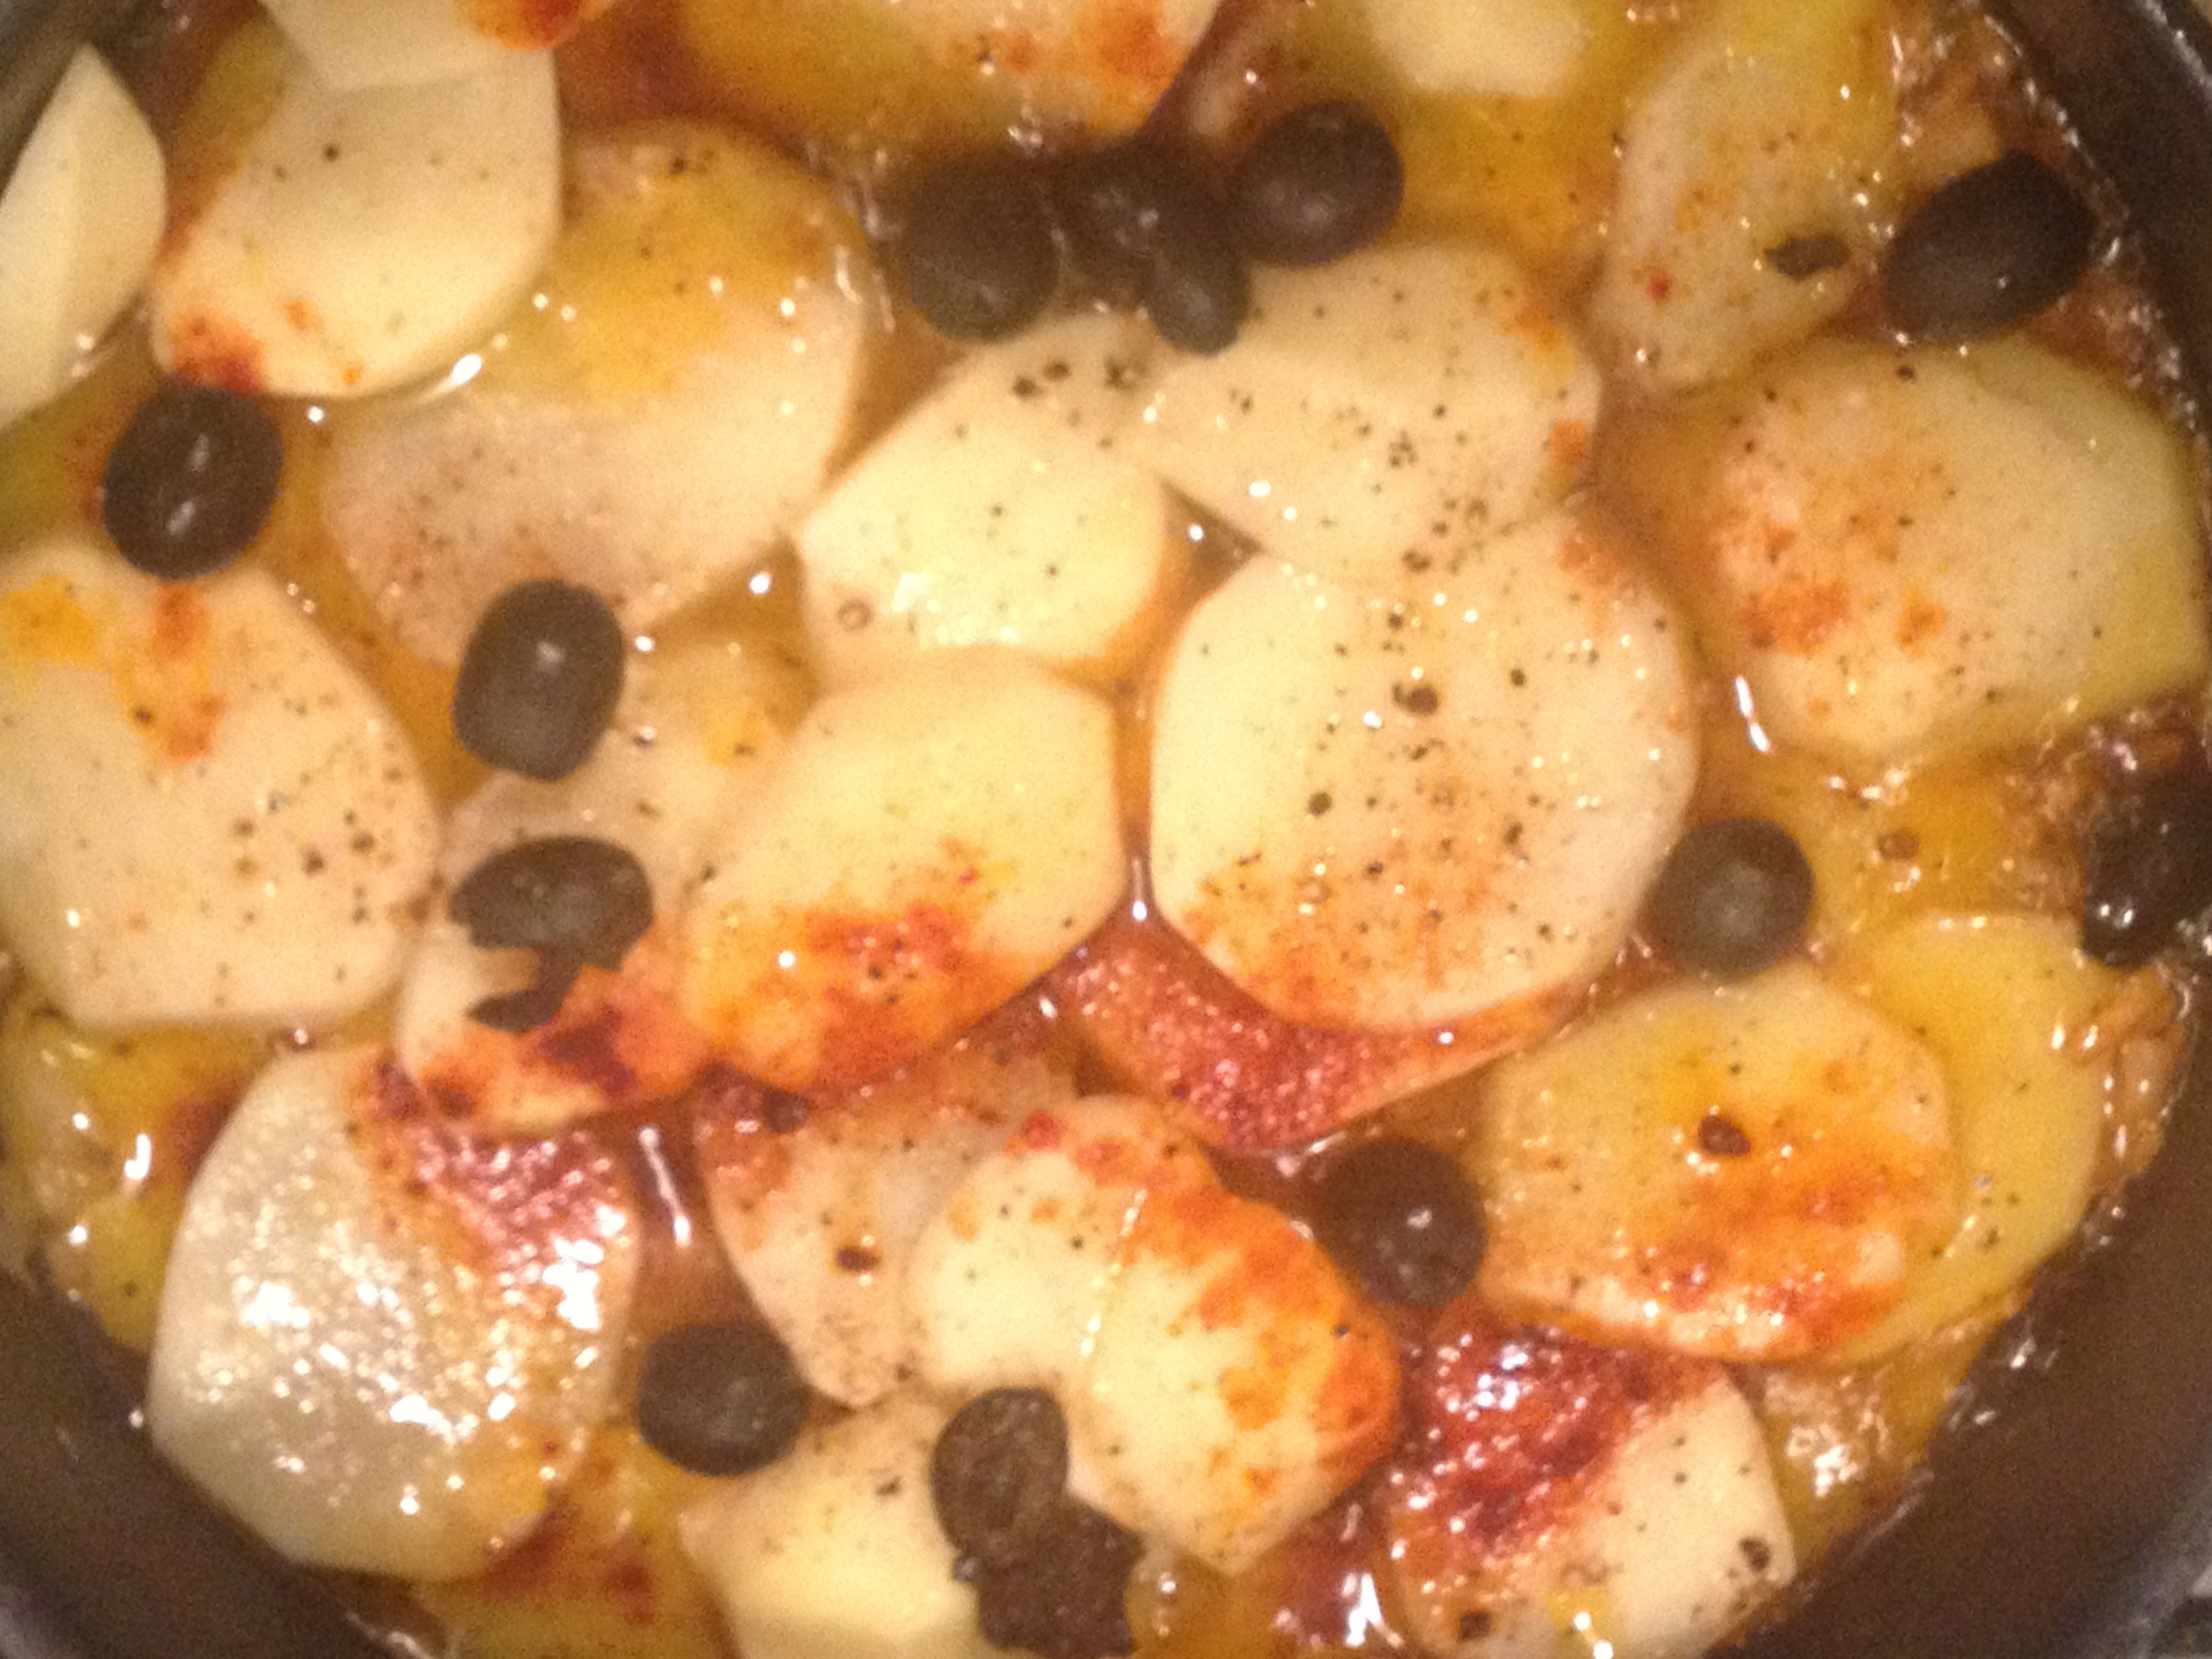
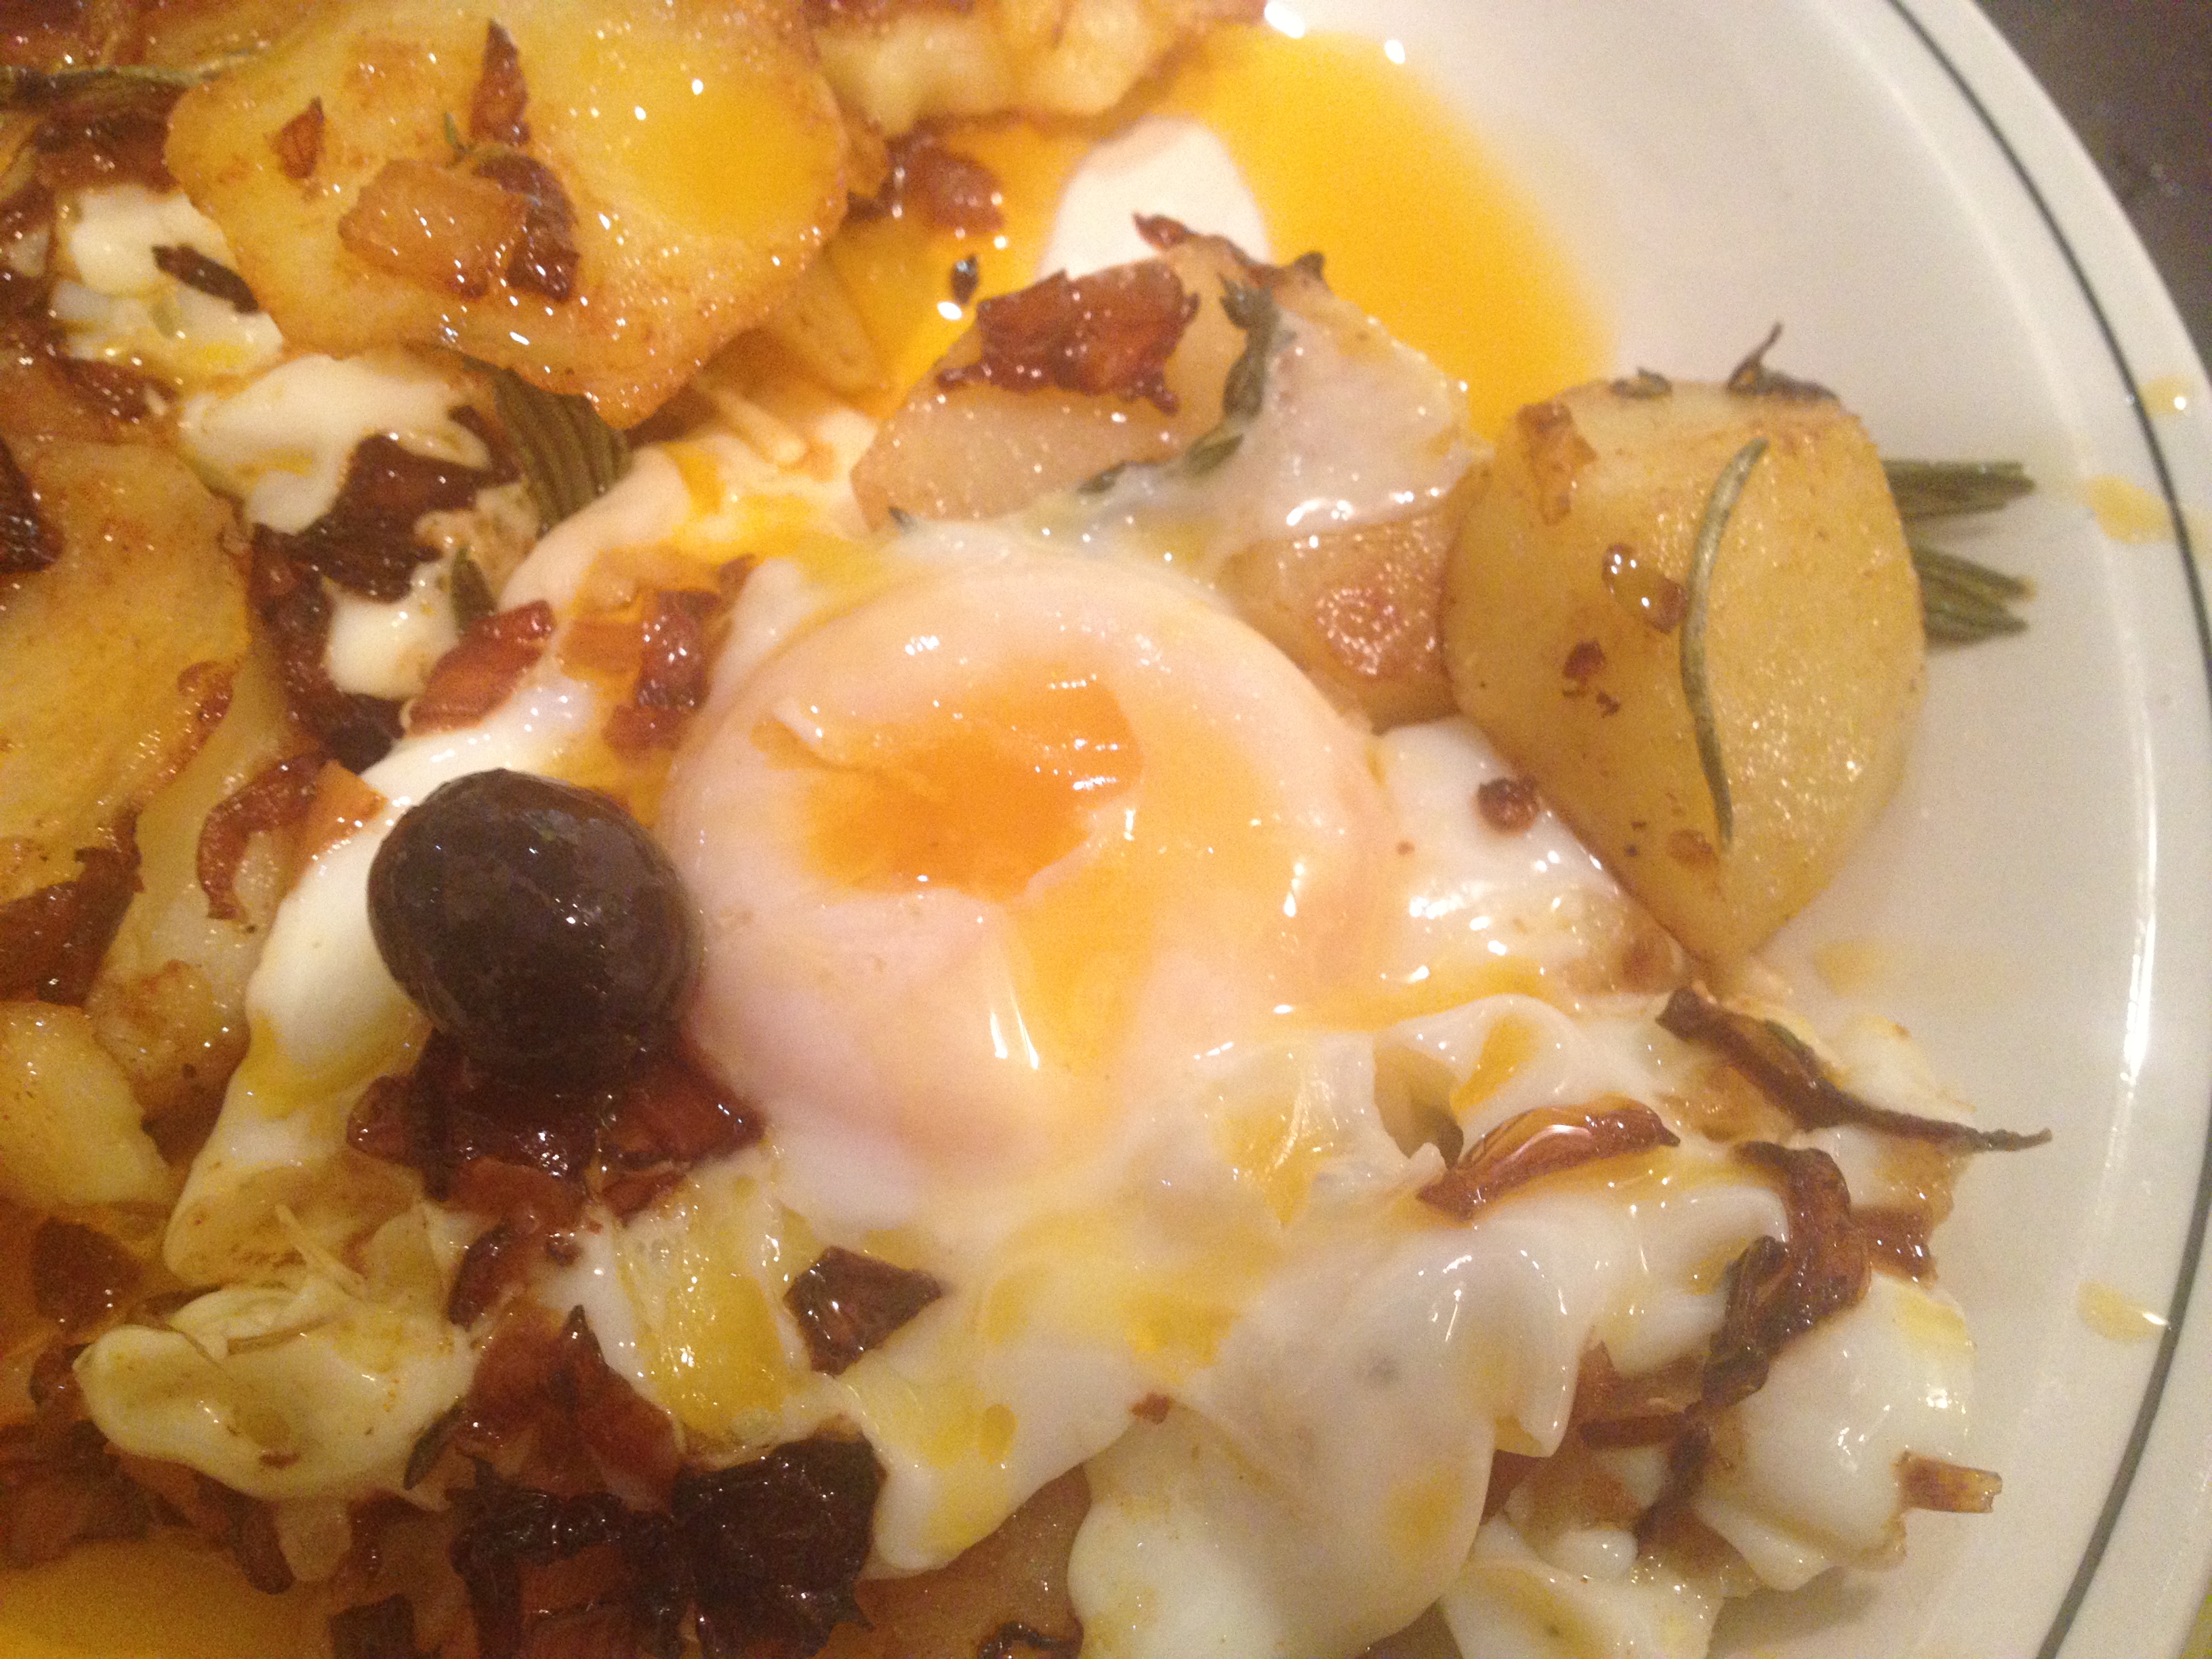
The aforementioned grandmother used to fry potatoes in oil and rosemary, and I don’t know if this particular detail was on purpose or not, but the crispy bits of potato stuck to the bottom of the pan were always my favourite. For me, potatoes made this way beat any results you can get from an oven. Cut the potatoes quite thinly and arrange them in 2 or 3 layers in a deep frying pan, then cover them in nice olive oil. I added to that: smoked paprika, black olives, rosemary, thyme, salt and pepper. And since the resident vegetarian insisted on having dinner too, towards the end of cooking time, I split the portion between 2 pans, adding anchovies to mine and a couple of eggs to his. The eggs cooked gently and ended with a runny yolk, which immediately took the taste and colour of the paprika. The anchovies melted beautifully into the oil, producing a rich and velvety sauce to coat the potatoes and bring a contented smile to my face.
And then I tackled the suspicious looking tomatoes: panzanella, or stale bread and tomato salad, really is such a simple solution to mankin problems. The only trick here is to prepare the salad not more than 15 minutes before you’re planning to eat it, so the bread doesn’t get too soggy.

A last minute update: just before posting this, I found an abandoned aubergine in the bottom drawer of the fridge, and that went with the leftover olive oil from the previous night’s potatoes, some fava beans, and the lot into a cous cous.
And now we move to the freezer.

Smokey potatoes in olive oil and anchovies
Add other ingredients you may have lying around that go well with the potatoes. The one thing not to compromise here is the quality of the olive oil. Use the nicest you have.
Ingredients:
Peel the potatoes and cut them into approximately 1 cm (just under 0.5 in) slices
Fill a deep saute’ or frying pan with plenty of extra virgin olive oil and warm it in a medium heat, but not too much as to become smoky.
Add the potatoes, forming a tidy layer to cover the bottom of the pan.
Sprinkle some salt and pepper, smoked paprika, then place a couple of springs of rosemary and thyme.
Add a second layer of potatoes and continue with the same ingredients until you used all the potatoes. Up to 3 layers will cook well. Any more, and you’ll end up with burned potatoes and the bottom and uncooked ones in the middle.
Set the eat to lowr, cover the pan and let it cook for 15 to 20 minutes.
Towards the end, when the potatoes are almost tender, add the anchovies. Push a few of them towards the bottom of the pan. They will melt quickly and mix with the olive oil and paprika sauce. Leave the rest of the anchovies on the top of the potatoes.
Cover the pan again, cook for a further 5 minutes, and it’s ready.
Eat with crusty bread to mop up the juices.
Vegetarian version:
Replace the anchovies by 2 eggs. Carefully make a small nest by shifting a few potatoes to the side, and gently break an egg into it. To the same again with the other egg, then cook for only 2 to 3 minutes, so the yolks remain runny.
