I know, I know. It is the middle of winter. And we’re about to see some snow in London. I came across a post that remained unpublished since a very hot week last year, after my last supper club for … Continue reading

I know, I know. It is the middle of winter. And we’re about to see some snow in London. I came across a post that remained unpublished since a very hot week last year, after my last supper club for … Continue reading

Happy new year!
Rushed off my feet as I was during Christmas week, I managed to squeeze in some time to eat as much panettone as I could manage. In between feedings, my days were divided as follows:

Back to the panettone, let me explain a festive routine we go through in this house. Every year, around the first week of December, I go Gennaro to stock up on their own brand panettone, before they run out. Gennaro is this Italian oasis of a shop in Lewisham, where you expect to bump into a 1950s Sofia Loren throwing tomatoes at you at any moment. It’s tiny, packed to the very last inch with food, permanently loud and busy. They make delicious panettone, just the right side of fluffy, fragrant and with the best crust I ever tasted. I keep a couple for us, and buy a few for presents. And around the 20th December, we run out and I run back to Gennaro begging for any cakes I can get my hands on, because what is Christmas without panettone?
For someone who gets so annoyed by picky eaters, I do have quite the nerve when it comes to panettone. I never grew out of my childish dislike of raisins and candied fruit. I know what you’re thinking: they do make fruitless panetonne, you know. Ah, but – and this is when even I get on my nerves! – I insist on a cake loaded with raisins, because… I like the taste they leave behind! Yes, God forbid someone picks the onions out of their meal. I will give them hell. But I go through a slice of panettone like a forensic investigator, removing every last bit of tiny fruit, and taking a good half hour to eat a single slice. Oh, how much it is worth it!

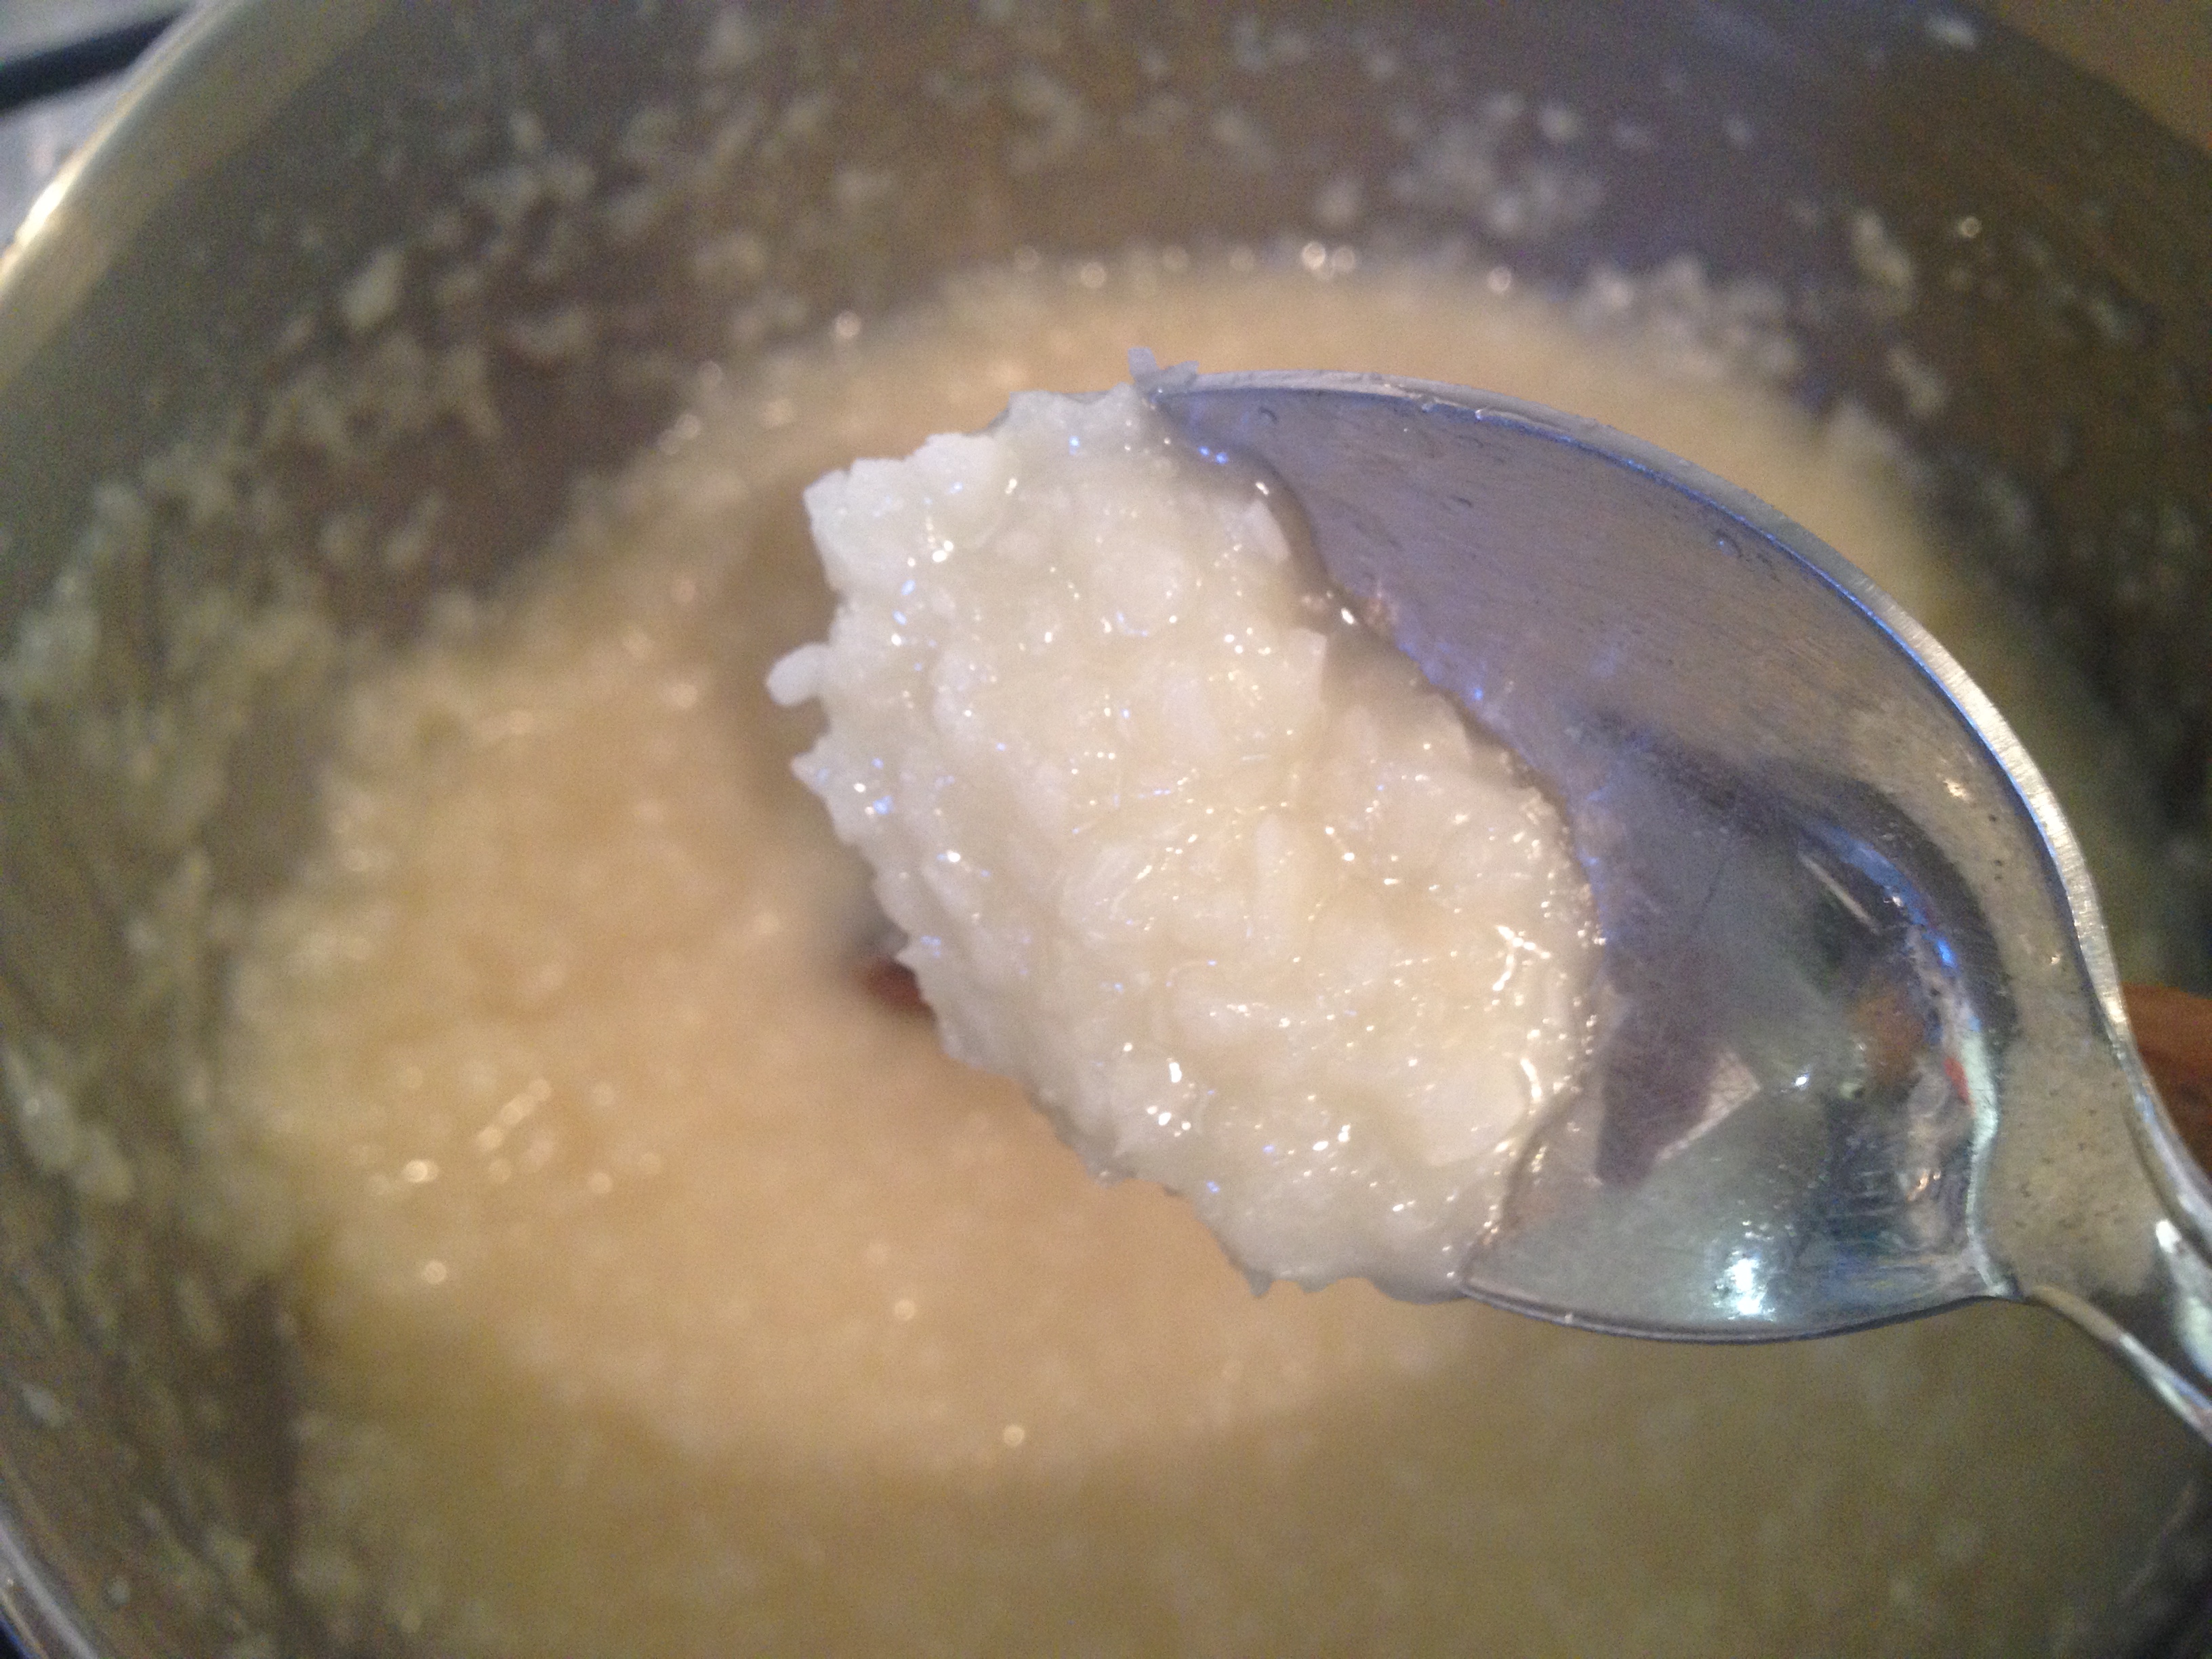
With the first week of January gone, I decided to admit defeat and accept we would not finish the last panettone. There was just under half of it left. Just as I was about to throw it in the bin, I remembered an old fashioned bread pudding I used to have as a kid. It’s one of those straight forward solutions to leftover bread. Which, like French toast or bread and butter pudding, tastes so much more special when made with fancy bread.

I put this in the oven this morning before starting work, and I’m afraid to say that half of it was wiped out for lunch. It’s just what you need to get you going on the dreary back-to-work rainy January: quick and easy, comforting caramely pudding.


Panettone Pudding:
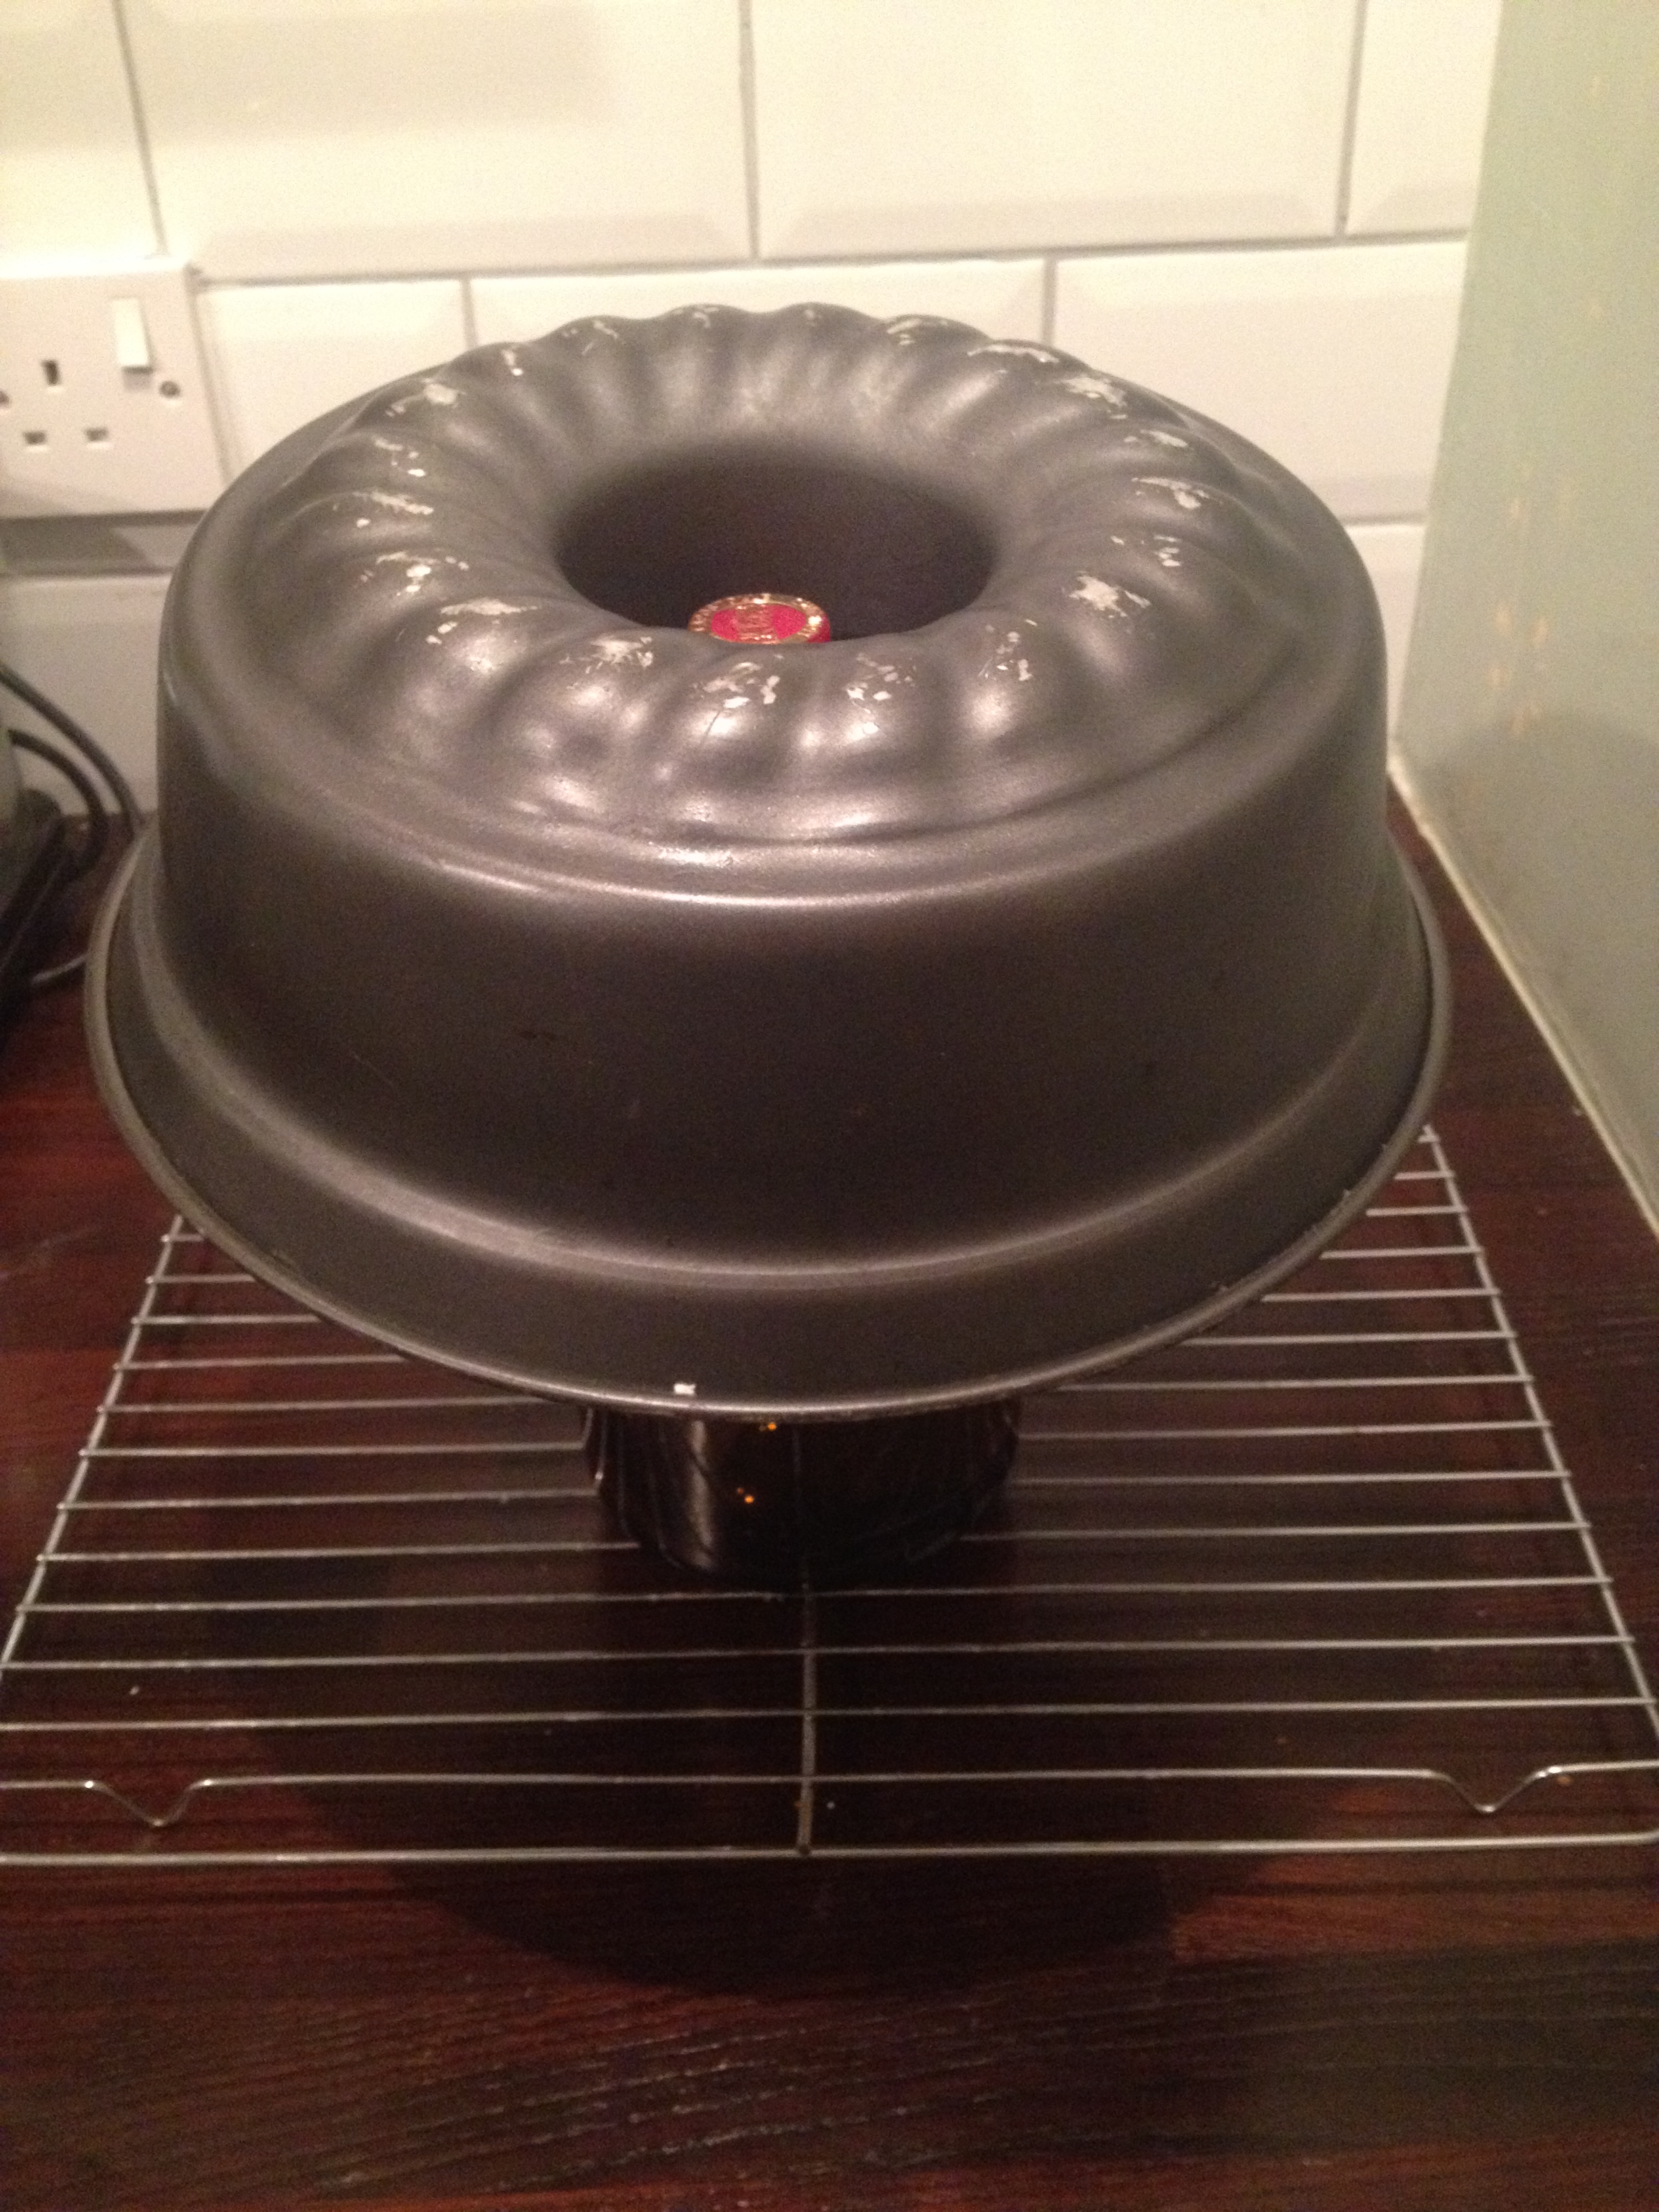
I went through my ritual of removing all raisins and fruit from my cake before making this. If you want to keep the fruit in, I suggest you still remove them, prepare the pudding, and then add the fruit back again. If you just blend the whole thing together, the mashed up raisins will leave a bitter taste to the pudding. As for the tin, I used a round 20 cm (8 in) one. If you have a small bundt cake tin, it would make a very pretty pudding.
Pudding:
Caramel sauce:
Place a roasting tray half filled with water in the over. Switch it on to 180C.
Make the sauce: in a heavy bottomed saucepan, melt the sugar on medium heat until you get a golden colour. Carefully add the hot water, and stand back as it will bubble furiously for a minute or so. Raise the heat to high and cook it until the sauce thickens a bit, stirring occasionally with a wooden spoon. This should take about 5 to 8 minutes, just so it’s thick enough to coat the back of a spoon.
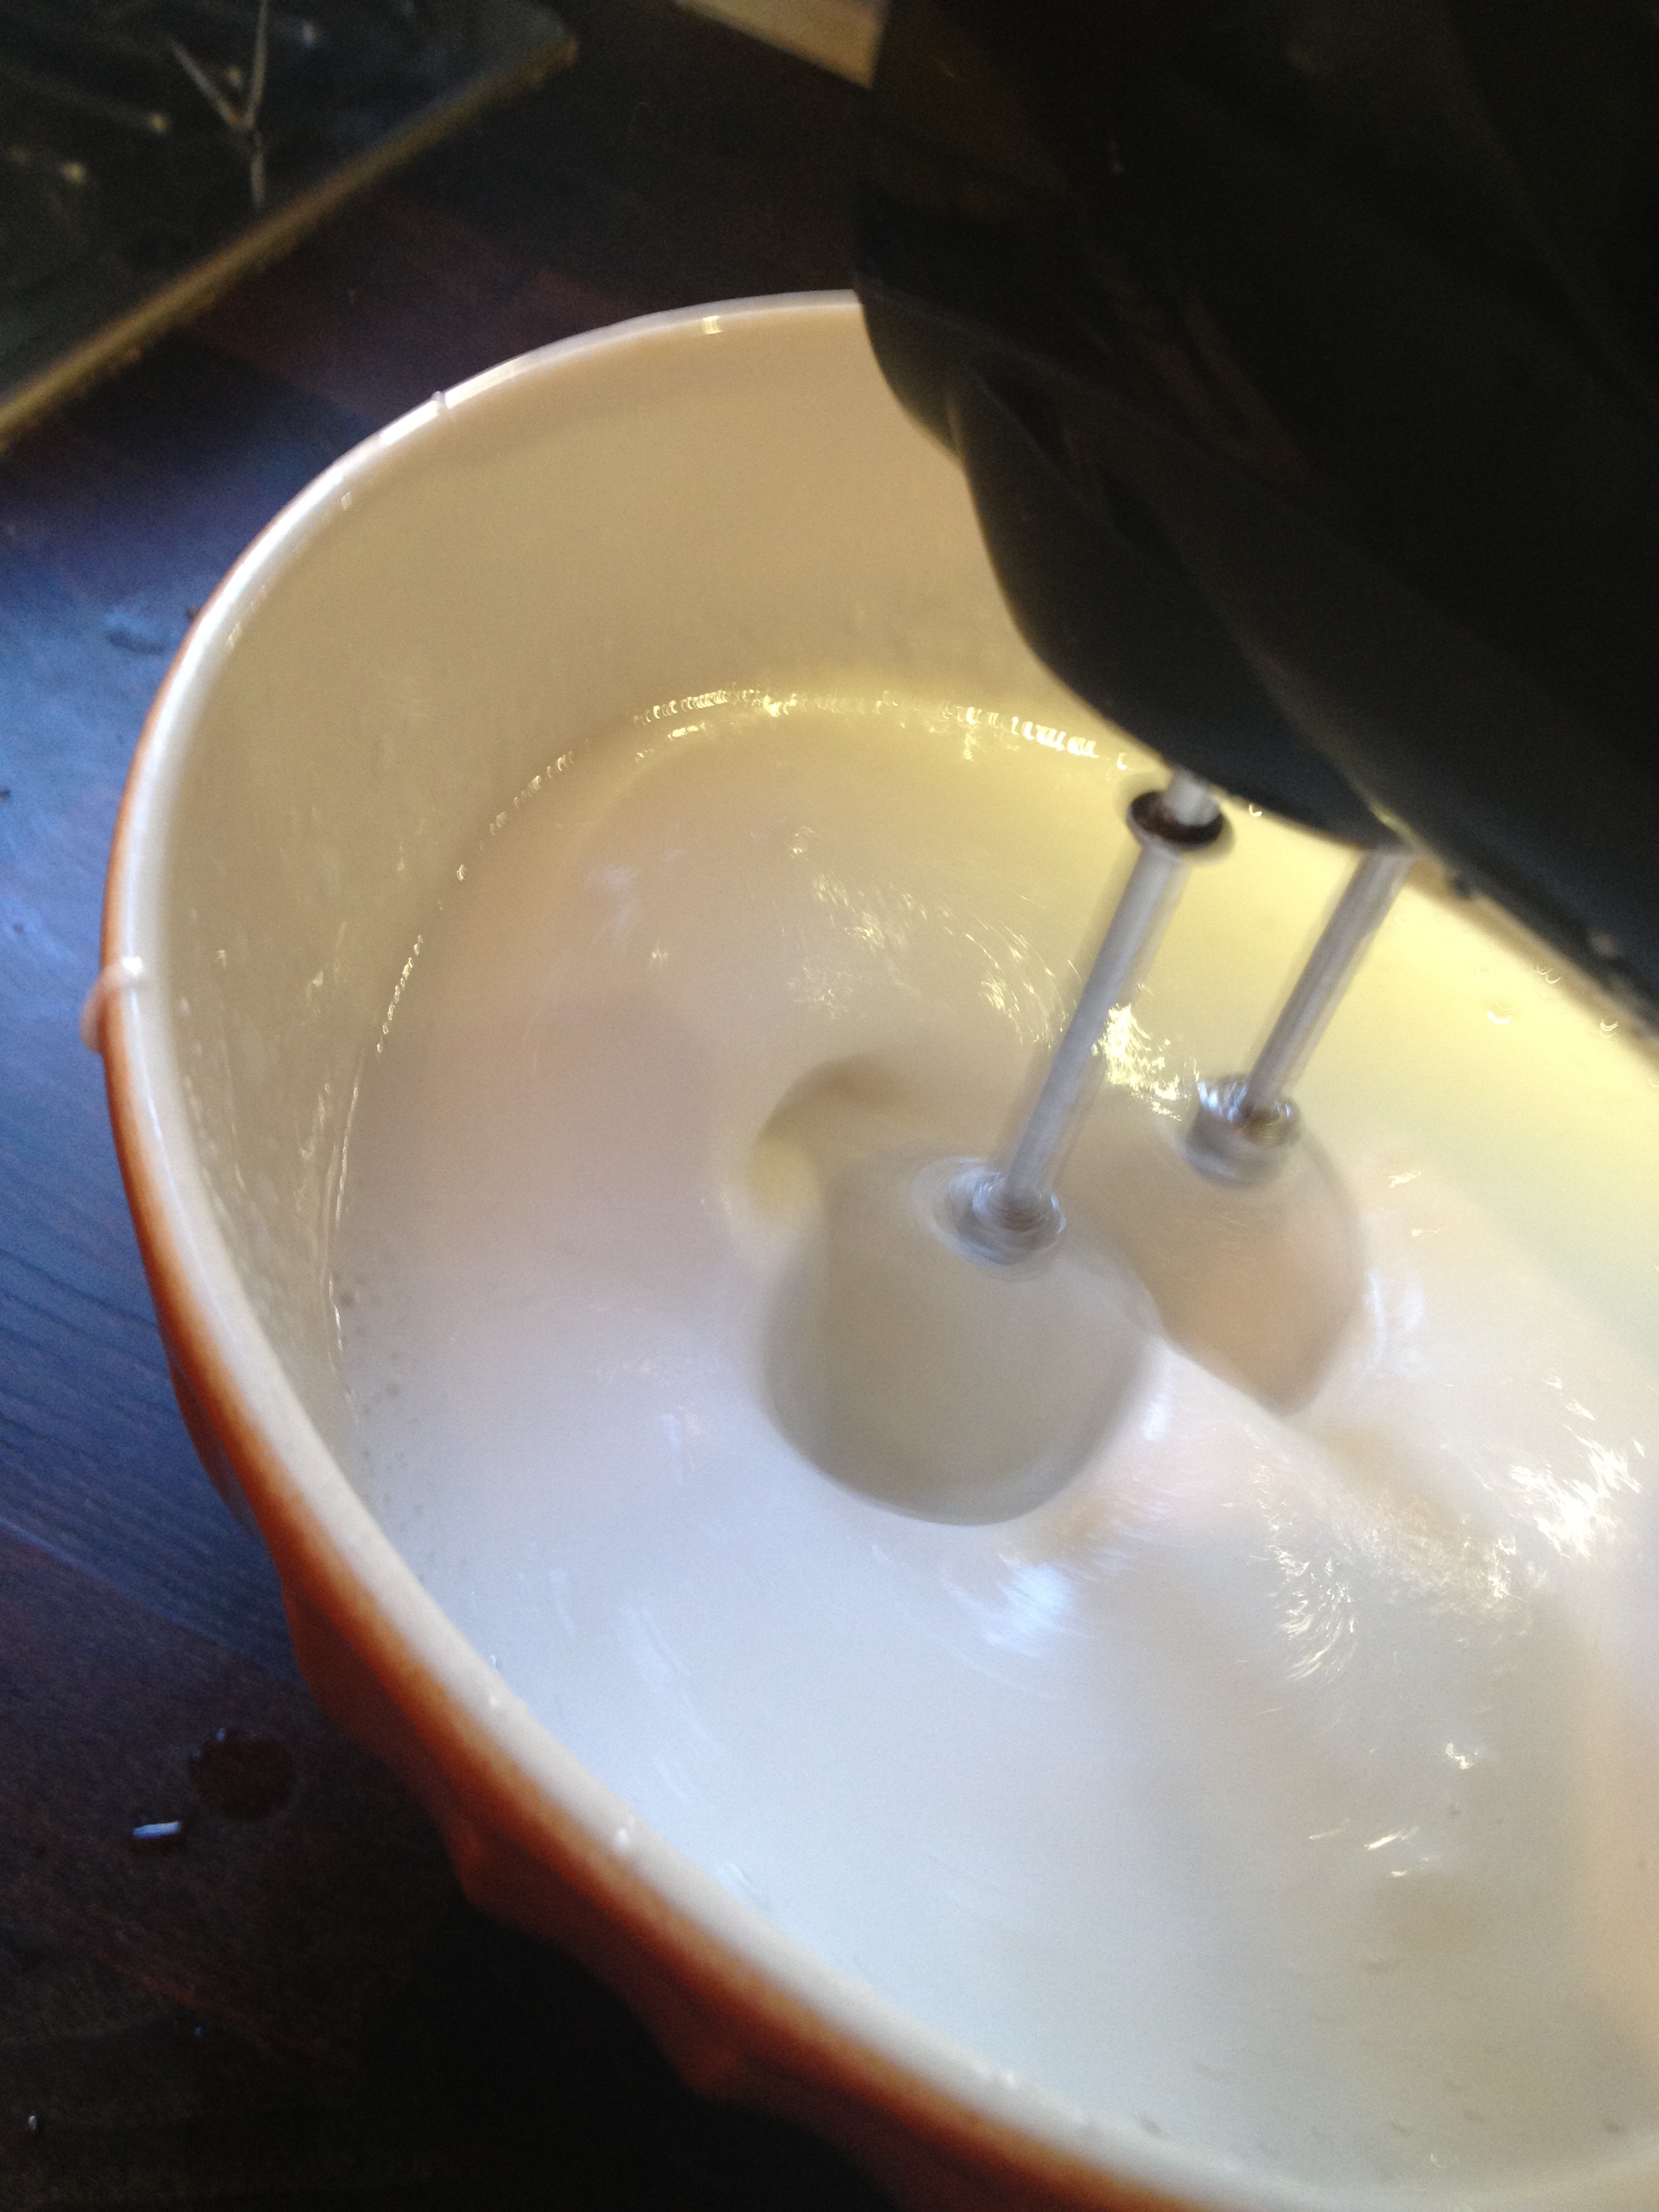
Mix all the ingredients for the pudding in a blender until completely smooth. This is not a bitty dessert. It should be as smooth as – but denser than – a crème caramel.
Pour the hot sauce into a baking tin and tilt it so the sides of the tin are coated. You should still end up with a thick layer of liquid caramel at the bottom of the tin.
Pour the pudding mix over the caramel, taking care not to mix them. Carefully wrap the bottom of the tin in foil, and place it inside the roasting tray with water in the over. Cook it on the bagne-marie for about an hour – it should still be a bit wobbly.
Remove it from the oven, let it cool a little, and invert the pudding onto a serving plate while still warm. Let all the caramel drip over the pudding.
Serving suggestion: have a warm slice immediately, then place the pudding in the fridge and eat the rest of it when it’s completely cold.


We have little shops selling fresh ricotta, lovely neighbours with generous cherry trees, and we are a safe distance away from chaotic central London. These are some of the many reasons why South East London rocks.

Like most people living in London for more than 5 minutes, I have it as a rule to avoid Oxford Street and its noisy crowds, dreadful traffic, visual pollution and generally irritating surroundings. During the Summer months, that rule becomes an amber alert, taking into consideration the tourist population, and my pathological lack of patience with slow pedestrians hogging the pavement. Last Saturday, I had to make an exception for a very good reason: a new Kitchenaid! My mum decided she wanted to buy me one, and as the good daughter that I am, I gratefully accepted it. Selfridges had a sale on, and seemed to offer the best price, and so I headed to the more salubrious end of Oxford Street to see those babies in person and be sure to pick the right colour. Of course I had forgotten it was Pride Parade day, the traffic was twice as bad, half of Oxford street was closed off even for pedestrians, and it took me two hot, sweaty, sweary, nervy hours to emerge at the other end and smell the sweet air of Selfridges. Feeling immediately soothed by the kitchen department, I decided I could still do with a glass of something and some slices of San Danielle ham, and another glass of something else … well, before I knew it, I was cutting it short to make it back for the Brazil match.


Which is why, in my rush, I nearly missed the 1950s moment happening right on my doorstep as I rushed back home (through a much smarter and faster route, caring a bit less anyway after my hefty aperetif session).
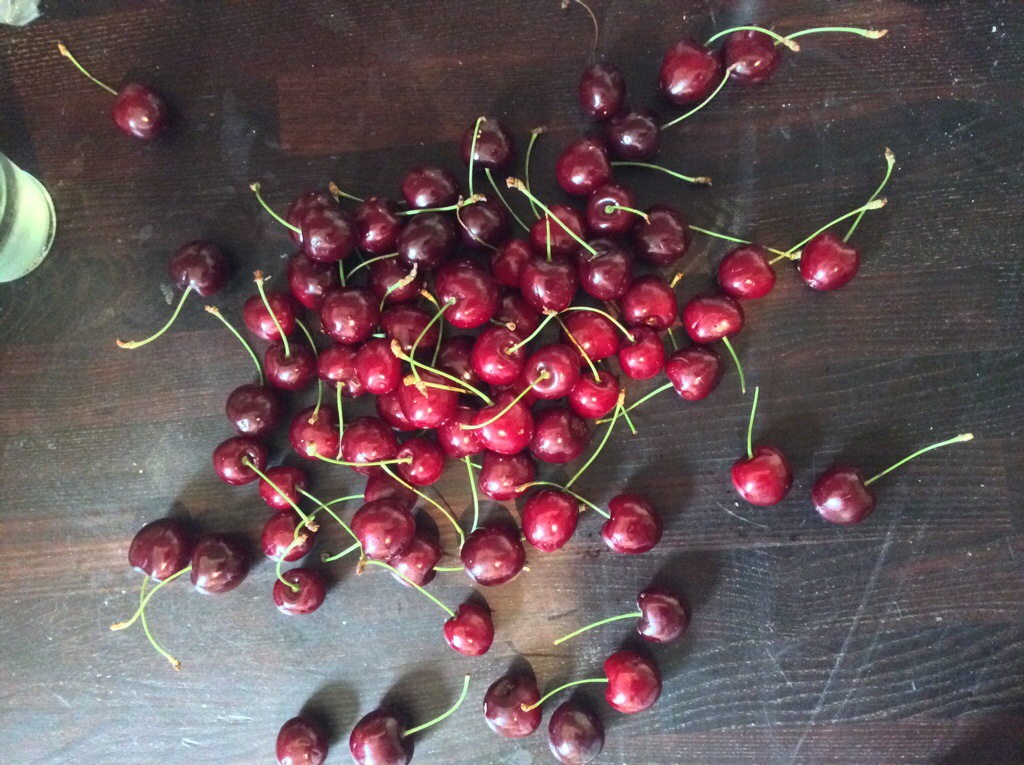
Who doesn’t love a lemonade stall sort of enterprise? A bunch of kids selling the produce of their garden cherry tree, a pound a bag. Their mums were overseeing the operations, chatting away to neighbours. Total food miles: zero.

I quickly started on a bag, but had to stop myself choking on a pit, as I screamed and pleaded with Brazil to get a move on as we hung to the world cup by the skin of our teeth.

Next day, my cherry project took shape as I was buying some ricotta for dinner. I could eat ricotta for days on end, and the same goes for Greek yogurt. I was looking at both of them in the shop, and wondered what frozen yogurt would taste like if I mixed some ricotta into it. And than added a ripple of cherry jam.
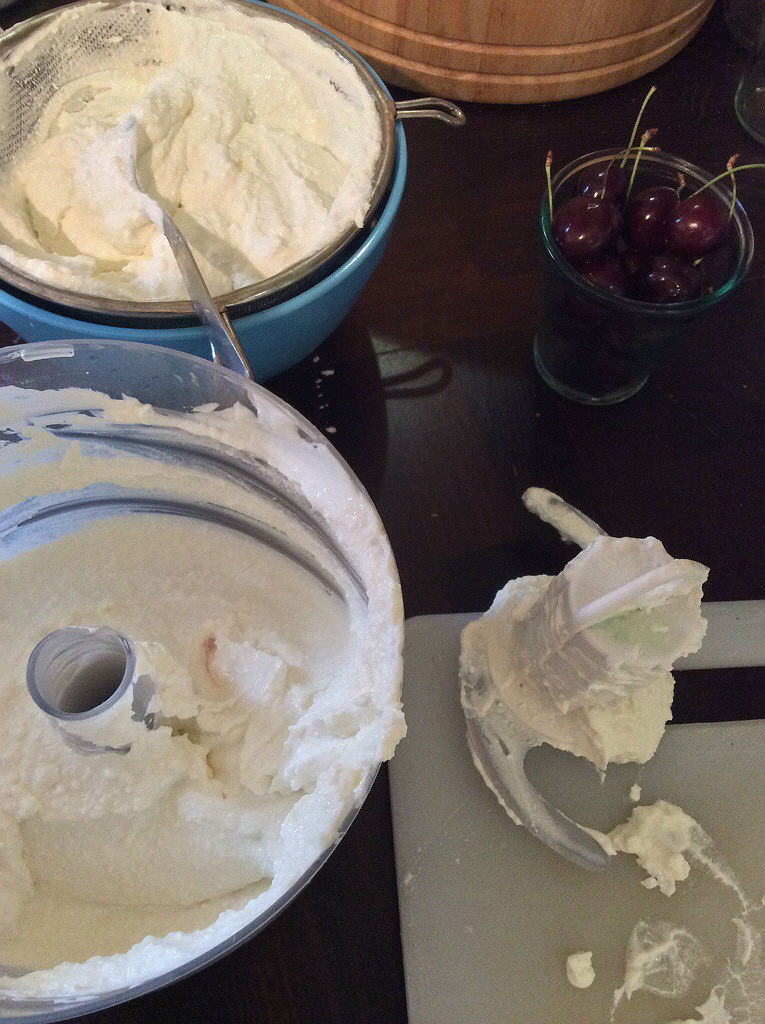
Let me tell you what happens: you end up with creamy, rich frozen yogurt, with juicy bits of thick sticky cherry running through it. I found some creme de cassis and added to the cherry jam. I’m not entirely sure how child friendly this makes my frozen yogurt, but I took some back to the cherry mums, and they seem happy enough with it.

Three cheers to Catford and our cherry trees!
Cherry ripple ricotta frozen yogurt
Cherries will forever taste foreign and northern-hemisphery to me. As for frozen yogurt, they may be a bit 90s, but I never got over them. What’s not to like? Fatty yogurt, turned into ice cream? The creme de cassis completes the nostalgic 90s theme.
For the cherry jam:
For the ice cream:
Make the jam:
Pit and roughly chop the cherries.
In a heavy saucepan, add the cherries and the rest of the ingrdients, bring it to a boil, and let it cook in medium heat for about 30 minutes until you have a thickish jam. Let it cool completely.
Make the frozen yogurt:
In a blender, blitz all the ingredients until smooth.
Press the yogurt – ricotta mix through a sieve so it’s not too bitty.
If you have an ice cream maker, follow the manufacturer’s instructions from here.
I don’t have one (mother?), and here’s what I’ve done:
Place the mixture into a non metallic container and take it, uncovered, to the freezer. Leave it an hour and mix it with a fork, making sure there are no crystallised bits. Mix it again an hour later. Wait one more hour, and this time add the cooled jam to it and mix it as much or as little as you like. I made mine reasonably pink, but still left it a bit streaky. Leave it in the freezer for another hour, and it’s ready to serve. If you leave it overnight, remove it from the freezer about 30 minutes before serving. It should be creamy, but not melting.

This is a tale of redemption. The lesson here is: when life gives you chocolate and coconut, put them together. Because it’s a match made in sweet heaven.
I started last week with a clear image of a happy Easter egg assembly line in my kitchen. My plan was a simple one, and seemingly a winner: home made Easter eggs made of two thin layers of milk chocolate, and a creamy coconut paste in between them. An Easter egg Bounty bar, if you will.


And then a succession of failures ensued. The picture inside my head was quickly shot down by reality. The pile of coconuts I had planned to grate yielded a bunch of dried, brown, foul smelling pulp that went straight to the bin. And Easter egg moulds proved to be the most difficult kitchen item to procure in the history of the world. By the time I resigned myself to the fact that no shop in the UK was prepared to sell me chocolate moulds – they’re either discontinued, or require a purchase no later than Christmas to guarantee delivery by Easter – I had a large bowl of delicious creamy coconout in my hands. Yes, because shredded coconut made an excellent alternative to the fresh stuff.
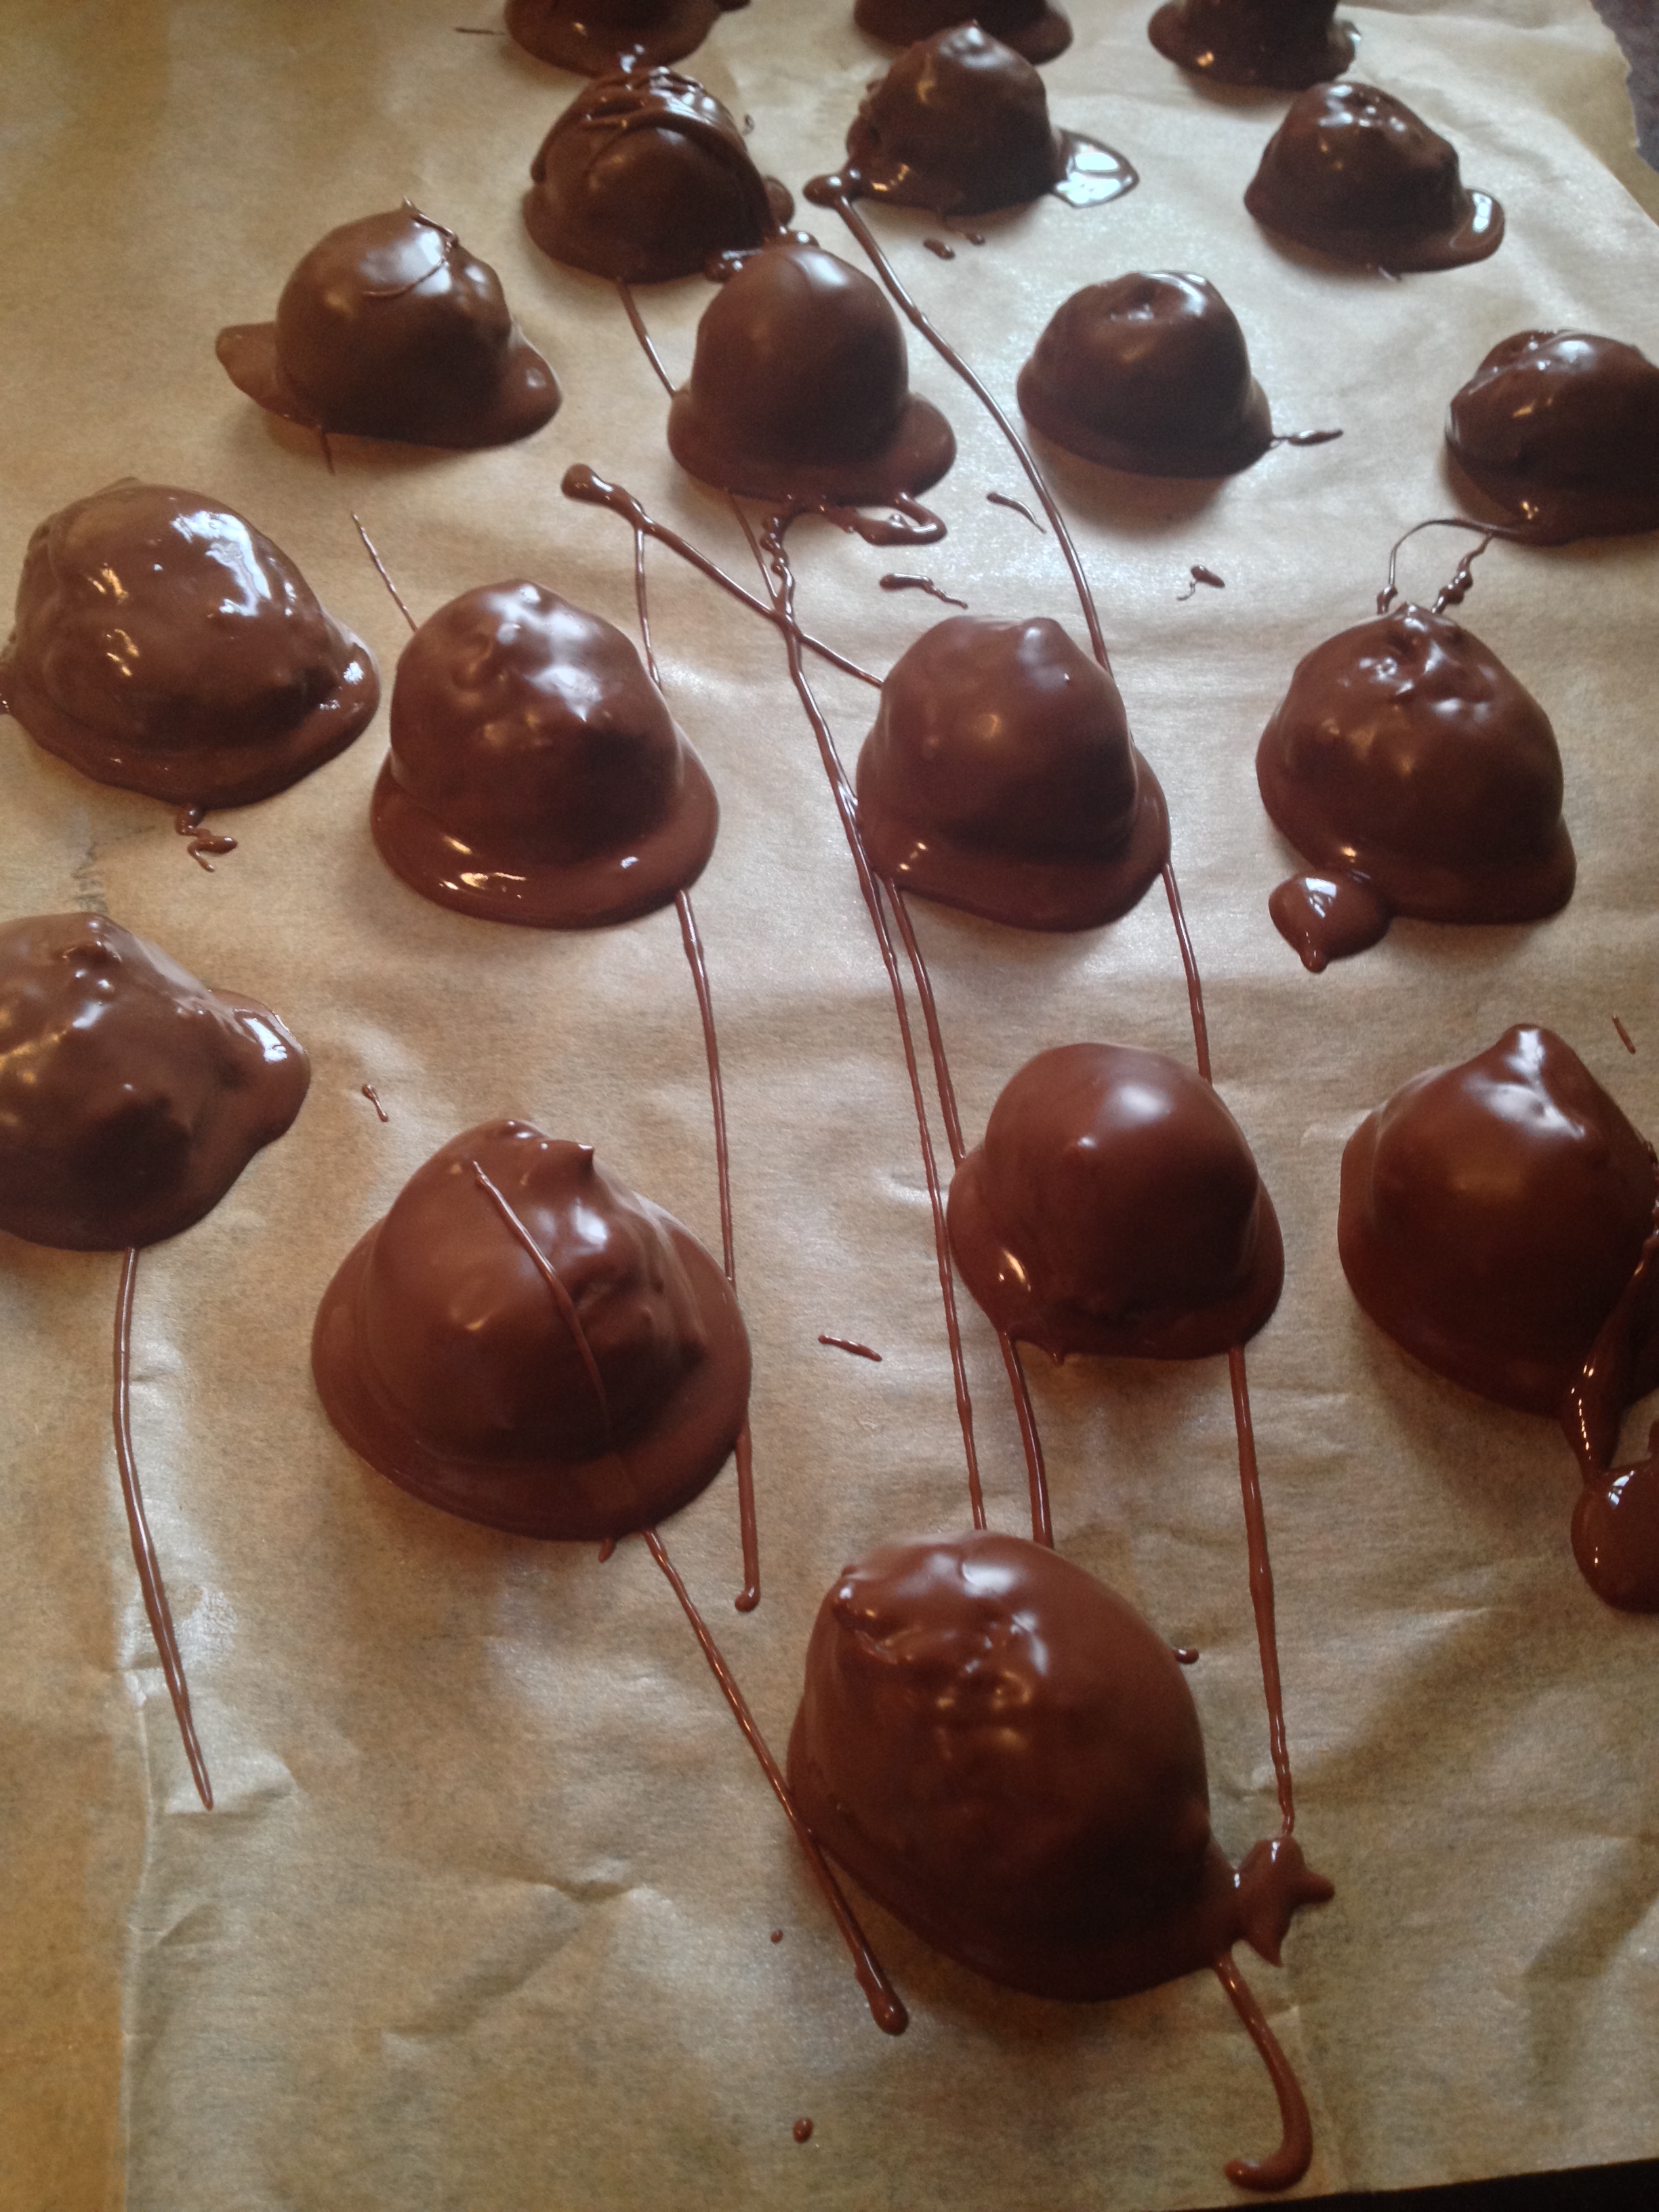
And so I finally let go of the original Easter egg idea, and instead had an enormous amount of fun melting chocolate and turning them into coconut-chocolate bars. This was not the fancy, exclusive chocolatier boutique sort of bar. Yes, they taste moreish and delicious. But they look far from perfect and pristine, and since it is Easter, I decided to dress them in not exactly the most elegant or sober packaging. After all, Easter eggs are like chocolate in drag. I made mine into small morsels and wrapped them in colourful tissue tied up with ribbon. And I am now sitting here praying the weather will hold, as there are dozens of these things spread around the garden, ready for tomorrow’s Easter egg hunt.
Happy Easter!

Post-Easter update: the chocolate disappeared in record time. I thoroughly recommend this if you’re looking for an instant crowd pleaser.


Chocolate coconut bites
The first step in this recipe should read: Move to a tropical country. Sadly, the coconuts I managed to find in London were no good. The alternative was very good, and I ended up with a moist coconut paste that carried a lot of flavour. If possible, look for packets of flaked, instead of dessicated coconut. There’s more moisture and flavour in them. I then shredded them finely in a food processor. The coconut paste is incredibly tasty on its own, and I’d advise you to make a little extra, as several spoonfuls seemed to mysteriously disappear in the making of this.
As for the chocolate, I went for milk, as the kids I was making this to prefer it. I like Green&Black’s for an easily available, reasonably priced, good quality chocolate. Choose the chocolate you prefer, and go for a really fancy one for a treat – and if you’re not feeding a bunch of famished kids!
makes about 50
Make the coconut paste:
Put the coconut (fresh or flaked) into a food processor and shred it finely.
Mix shredded coconut, milk and sugar in a medium sized, heavy bottomed saucepan, and bring it to the boil. Continue to cook on medium heat for 20 to 25 minutes, stirring occasionally. Do not let it burn. It is ready when you can easily see the bottom of the pan as you stir it. You should end up with a thick porridge that doesn’t fall off the spoon as you turn it. Let it cool completely before using it.
Melting the chocolate: If you’ve never made chocolate, this step-by-step guide from the BBC Good Food pages is excellent. If you don’t have a kitchen thermometer, here’s a rough guide that will work well in this recipe:
Assembling the chocolate-coconut bites:
Grease your hands a little with butter. Take about a full teaspoon of coconut paste into your hands and roll it. Dip the coconut ball into the chocolate to coat it well, pick it up with a fork and let the excess fall into the bowl, then rest the final product on a sheet of parchment paper. Let it cook completely, ideally for a few hours until it has dried up well.
Wrap it up: I used a layer of foil for direct contact with the chocolate, and then wrapped tissue paper around the foil.


Children’s parties can be loud things. The ones I attended when I was growing up in Brazil were insane. Brazilians have a very sweet tooth. Very. We don’t go much for the hint, or suggestion of sugar in our desserts. We go the full hog. Back in the 70s, with not a lot of thought given to ADD or E numbers, there was nothing standing between a birthday table covered in glucose and a pack of 7 year olds. The result was a bunch of crazed kids buzzing around in a collective sugar rush for hours, until the first inevitable crash came knocking down everyone else like dominoes. And we all went home sobbing and a bit bruised, ready for the next birthday do.
One of the many treats I stuffed my face with in those parties was Maria-Mole. They’re not quite marshmallows, since there are no eggs in them, but it’s a similar texture, a little bit lighter, and covered in coconut. If you’re thinking of turkish delight, forget it. These are much more delicate, a bit more bouncy, and not chewy or sticky. Before you know it, an entire tray of maria mole can go in 2 minutes. They’re the very definition of moreish.
In the true spirit of the 70s, you’ll find maria-mole in various pink colouring shades, or coated in a thin film of chocolate, or sometimes sprinkled with toasted peanuts. I suspect the ones I had as a kid were out of a pre-mixed packet, with synthetic coconut flavouring. I like the white, unadulterated coconut version, and made my own here, dispensing with the help of Dr Oetker. You could use fresh coconut milk if you’re lucky enough to have them handy. I used coconut milk out of a tin.


And it worked a treat. Imagine biting into a coconut cloud. Made like this, maria-mole are definitely not a sickly children’s treat, and would make a very proud and grown-up appearance at any table. I served mine with coffee after Sunday lunch, and I wish I had some kids to blame for the mysterious disappearance of all maria-mole by the time I went to bed. With a slight ringing in my ears.

Coconut marshmallows
(Maria-Mole)


It was always going to happen. Another year, another Great British Bake Off, another rush of trying the show’s recipes.
This week I decided to finally have a go at 3 recipes I’ve been meaning to for a while.
 On Tuesday, after much anticipation, the new series of The Great British Bake Off finally started! Having worked up to the last minute before the show and with no time left to cook, I got myself a bowl of cereal and settled for an hour of emotional cake rollercoaster. The nerves, the suspense, the laughter, the oohs and ahs at the creative talent coming up with Gaudi-inspired tower cakes, it all left me exhausted. Mel and Sue remain at once hilarious and very sweet and protective of the contestants; Mary Berry delivered the authoritative yet benevolent presence. And Paul Hollywood remained the fair judge with a firm hand. It’s such a predictable formula, but, just like the sandwich cakes on the first round, it’s comforting and never seems to get old. My only criticism: they could have given us a double bill season opener. I had to spend the next hour on Twitter to get the GBBO chatter out of my system.

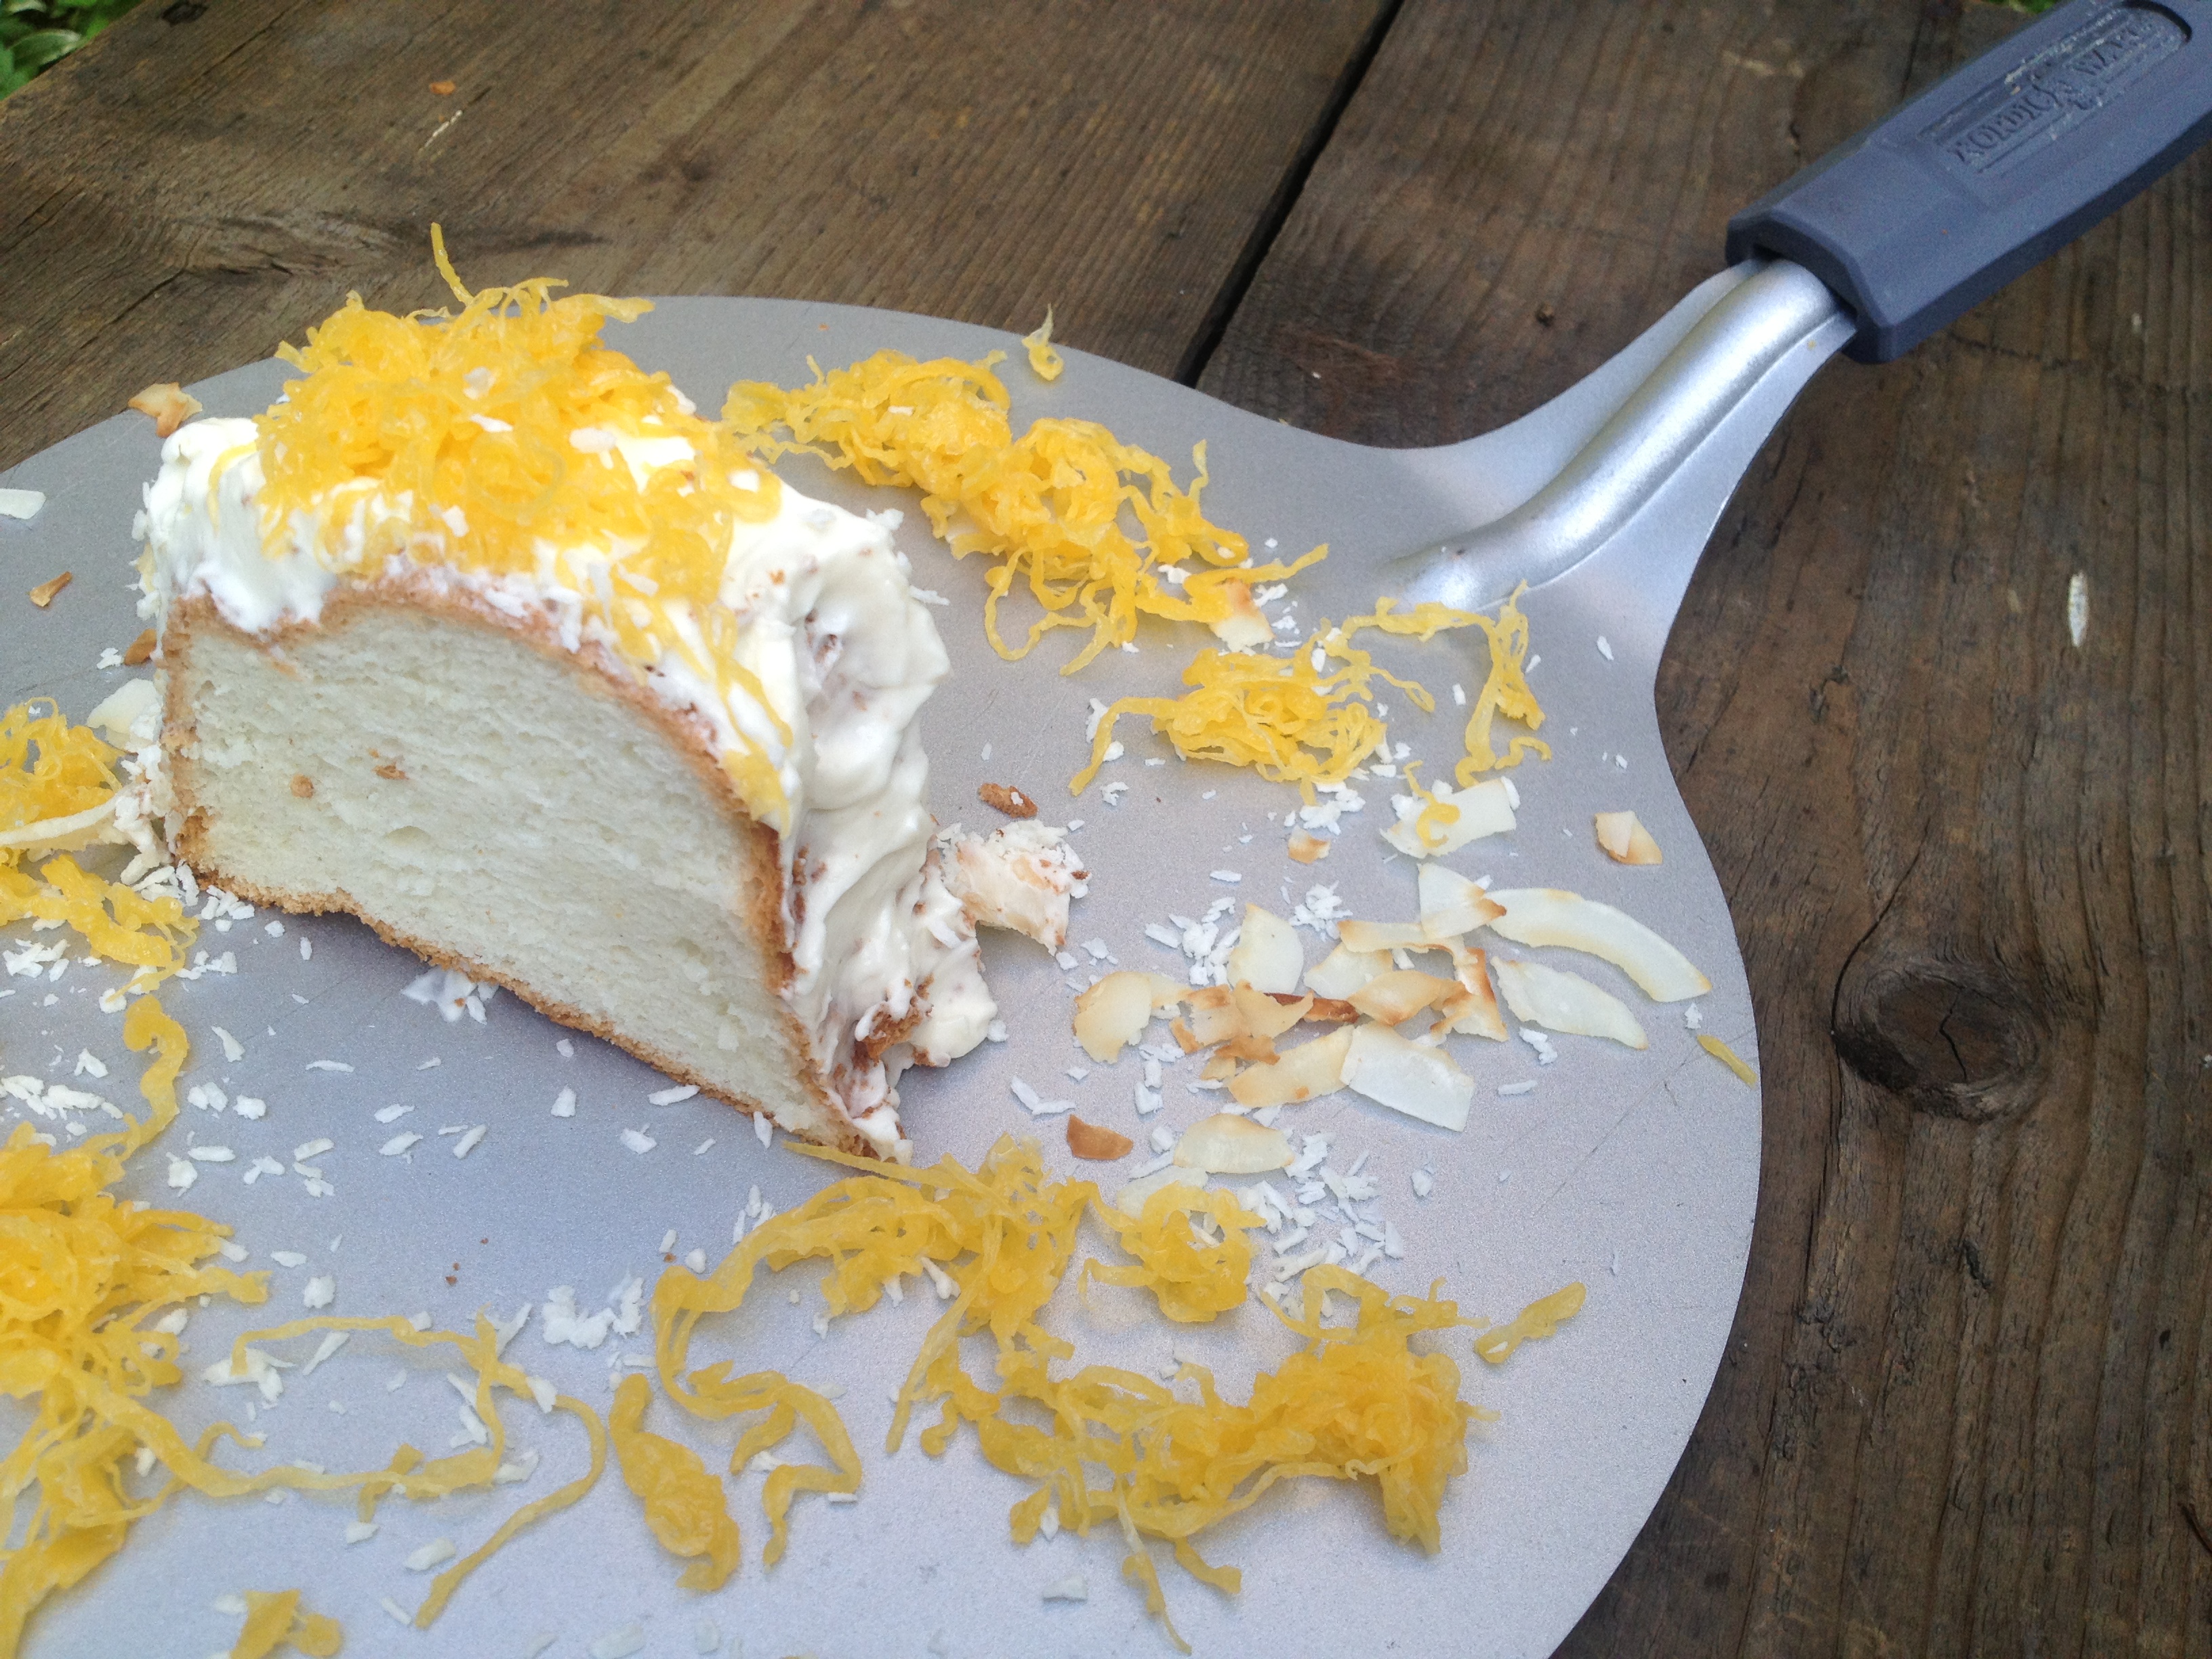
The technical challenge was an angel food cake. I had this cake on my to-try list since I first read about it a while ago on David Lebovitz’s blog. It looks very white, light and pure, and I imagine very easy to mop up with a glass of cold milk. Or champagne. Looking at American recipes online, there seems to be a firm division between camp pure and simple, and those who prefer adding a bit of jam for the taste and colour contrast. Mary Berry apparently likes hers with sweet whipped cream. I’m not a fan of whipped cream on cakes, but an alternative quickly sprang to mind: I’ve also been meaning to try a coconut frosting for some time. I love coconut a great deal. It always annoys me when I come across coconut cake recipes, and it’s actually vanilla cake with vanilla buttercream, the only coconut in it being the shredded variety on top of the frosting. That’s not a coconut cake! So, I quickly got excited about making the angel food cake and topping it up with actual coconut icing. For a bit of colour, my own technical challenge: angel hair. Or Fios de Ovos, as I know them.


Now, please hear me out. I KNOW this may sound strange and possibly repulsive, but it is a truly marvellous addition to desserts, and I am amazed it is not more widespread outside its native Portugal. Made with a gargantuan amount of egg yolks and sugar, these eggy threads are very popular in Brazil – I suspect possibly more well-known there than in Portugal. It is one of the sweets I dedicate hours to every time I visit Sao Paulo, marvelling at the resilience of my liver. It is surprisingly delicate and light for something that uses so much sugar, and juicy and sweet at every bite. I had never made it before, but this looked like the perfect opportunity. Since the cake took 12 eggs whites, I’d use the yolks for the angel hair.


 The angel food cake: it requires a special ‘non-non-stick’ tin with legs, to allow the cake to rest upside down after baking without falling out. Since it’s made with a lot of stiff egg whites and little else, it’s very airy and fragile when warm, and it risks collapsing under its own weight if you remove it too quickly from the tin. And so I toured the cooking shops and department stores of London looking for the special tin, feeling like a right fool running to the shops whenever the telly tells me to do so. (yes, I could have ordered online, but I wanted it NOW!) The standard reaction was: ‘ah, you’ve been watching the GBBO, haven’t you? No, we don’t have them.’ Now, a word to the British entrepreneurial minds: this is a massively – massively – popular show. It attracts the sort of obsessives like me who of course will run and make the recipes they see on the show. Is it really much of a leap to work with the show’s PR, anticipate and prepare for the obvious demand? I had the same problem over a decade ago when cupcakes started becoming popular after the famous Sex And The City episode and the success of Magnolia Bakery. It took a good 3 or 4 years for cupcake cases or stands to be available in shops over here. Anyhow, I didn’t find the tin, but used the trick of resting a bundt cake tin upside down on the neck of a bottle. I also spread a thin layer of raw batter over the surface of the cake to try to make sure it stuck to the tin, which was non-stick and the only one I had. It worked! The cake rose beautifully, stayed put in the tin after baking, and finally came out once cool in one glorious piece. It did not collapse. It was springy and very, very light. And at this point, I want to take a moment to say Thank You, America, for Angel Food Cake. If the world was a logical place, this would be known as wedding cake, because it would fit so well with most wedding decorations I can think of, and the lightness of it would be so welcome after a wedding feast. Although it is hard to improve on a name such as angel food.


The coconut frosting: is it too sad to admit that I dedicated a great part of my 4 day long weekend to perfecting this? None of the recipes I found quite did the trick, so I made this up with cream cheese, double cream and reduced coconut milk. It’s fresh and tangy and has a hint rather than a full-on taste of coconut.

And now for the fios de ovos (angel hair): it seemed the week was determined to throw obscure kitchen utensils at me. If you want to make this like a pro, you’ll need a special mug-funnel that I did not even attempt to look for. What you need to do with this dessert is have a cup of hardly beaten eggs yolks, then slowly and steadily pour a drizzle of yolks over a pan with steaming flavoured sugar syrup. Yes, it is essentially sugared egg yolks, but you really must try this to understand just how special it is. You could do this with a small sieve, but the specially designed funnel has larger holes that ensure continuous and long threads. I improvised: I got a small tin and made 5 large holes in it. It worked. The bright yellow threads looked striking over the fluffy white frosting. And the cake was as unique and delicious as described by every angel food cake enthusiast I met. If only Mary Berry could see me now!
Angel Food Cake: David Lebovitsz’s recipe
I went with almost the exact same recipe from David Lebovitz’s blog, which I am copying here with a few comments. I’ve adjusted the amount of eggs slightly, and replaced cake flour – not easily available in the UK – with a mix of all-purpose flour and a small amount of corn starch. His recipe states 45 minutes baking time. Mine was ready in just under 40, so start checking early.
Method:
If you have an angel food cake tin, use that. Do not grease it. Otherwise, a tube or bundt cake tin will do the job, but do not use non stick ones. As soon as the cake is ready, turn the improvised tin over the neck of a bottle – see step 6 below.
1. Preheat the oven to 180C (350F)
2. In a small bowl, sift together the flour, corn starch, 1/2 cup sugar, and salt.
3. Whip the eggs with an electric mixer. When they start becoming foamy, add the cream of tartar and lemon juice.
4. Increase the speed to high and continue to whip the egg whites until they just begin to hold their shape in soft, droopy peaks. Gradually whip the remaining 1 cup of sugar into the whites, 1/4 cup at a time. Do not overwhip; the egg whites should not be overly dry or stiff, but soft and cloud-like. At the last moment, mix in the vanilla.
5. With a rubber spatula, fold the flour and sugar mixture into the whites gradually, a small amount at a time.
6. Spoon the batter in the pan, smooth the top, and bake for 40 -45 minutes. Remove from the oven and immediately invert the tube pan over a cooling rack. If the pan doesn’t have “feet”, set it over the neck of a heavy bottle or overturned metal funnel, using the center hole of the pan to hold the cake, until completely cool – at least an hour.
Coconut frosting:
Method:
Fios de Ovos/Angel Hair:
Method:


What a rock ‘n’ roll of a weekend! I spent 3 days surrounded by food bloggers from all over the world, having an enormous amount of fun, learning, sampling good food and reaching for the prosecco on a regular basis. It was great to see people who have turned what I’ve been trying to do for 5 minutes into beautiful collections of recipes, stories, photographs, books, innovative food businesses, happy successful careers.
But apart from the food, another theme dominated the weekend: the heat. Humid, sweltering, oppressive heat. With all the excitement, over indulging, and hot weather, by Sunday afternoon I was exhausted and emotional, like an oversugared child at a birthday party. So I headed home, nearly staying on the air conditioned train for the rest of the day, just riding up and down the London suburbs in cool comfort. I made it home eventually and sat there, watching the nation celebrate Andy Murray’s triumph and trying not to move much.
 Even though I had little energy left, 3 days listening to food stories had me itching for the kitchen. Away from the oven, and preferably working with ice. Since my husband was begging me to finally get rid of the pile of overripe bananas by now attracting a growing population of hungry flies, I considered them first. Now, not only am I a great believer in using leftovers for cooking, I’m also fairly flexible when it comes to use-by dates. In particular in the case of bananas, which have a earmarked destination in my kitchen: they always turn into the Rolls Royce of the banana cake world that is the rum and nuts version from the Sticky, Chewy, Messy, Gooey cookbook – now, you try to come up with a cleverer name for a cookbook! Baking was out, though, and so I considered ice cream. And who knew that frozen blended banana magically turns itself into creamy ice cream? At least that’s what you’ll find in the first 2 pages of ‘banana ice cream’ results in Google. Even Jamie Oliver’s doing it. News to me, but a clear winner on parents forums, as a healthy summer snack with no added sugar, or any other ingredient, for that matter. Just bananas, frozen, blended, then frozen again.
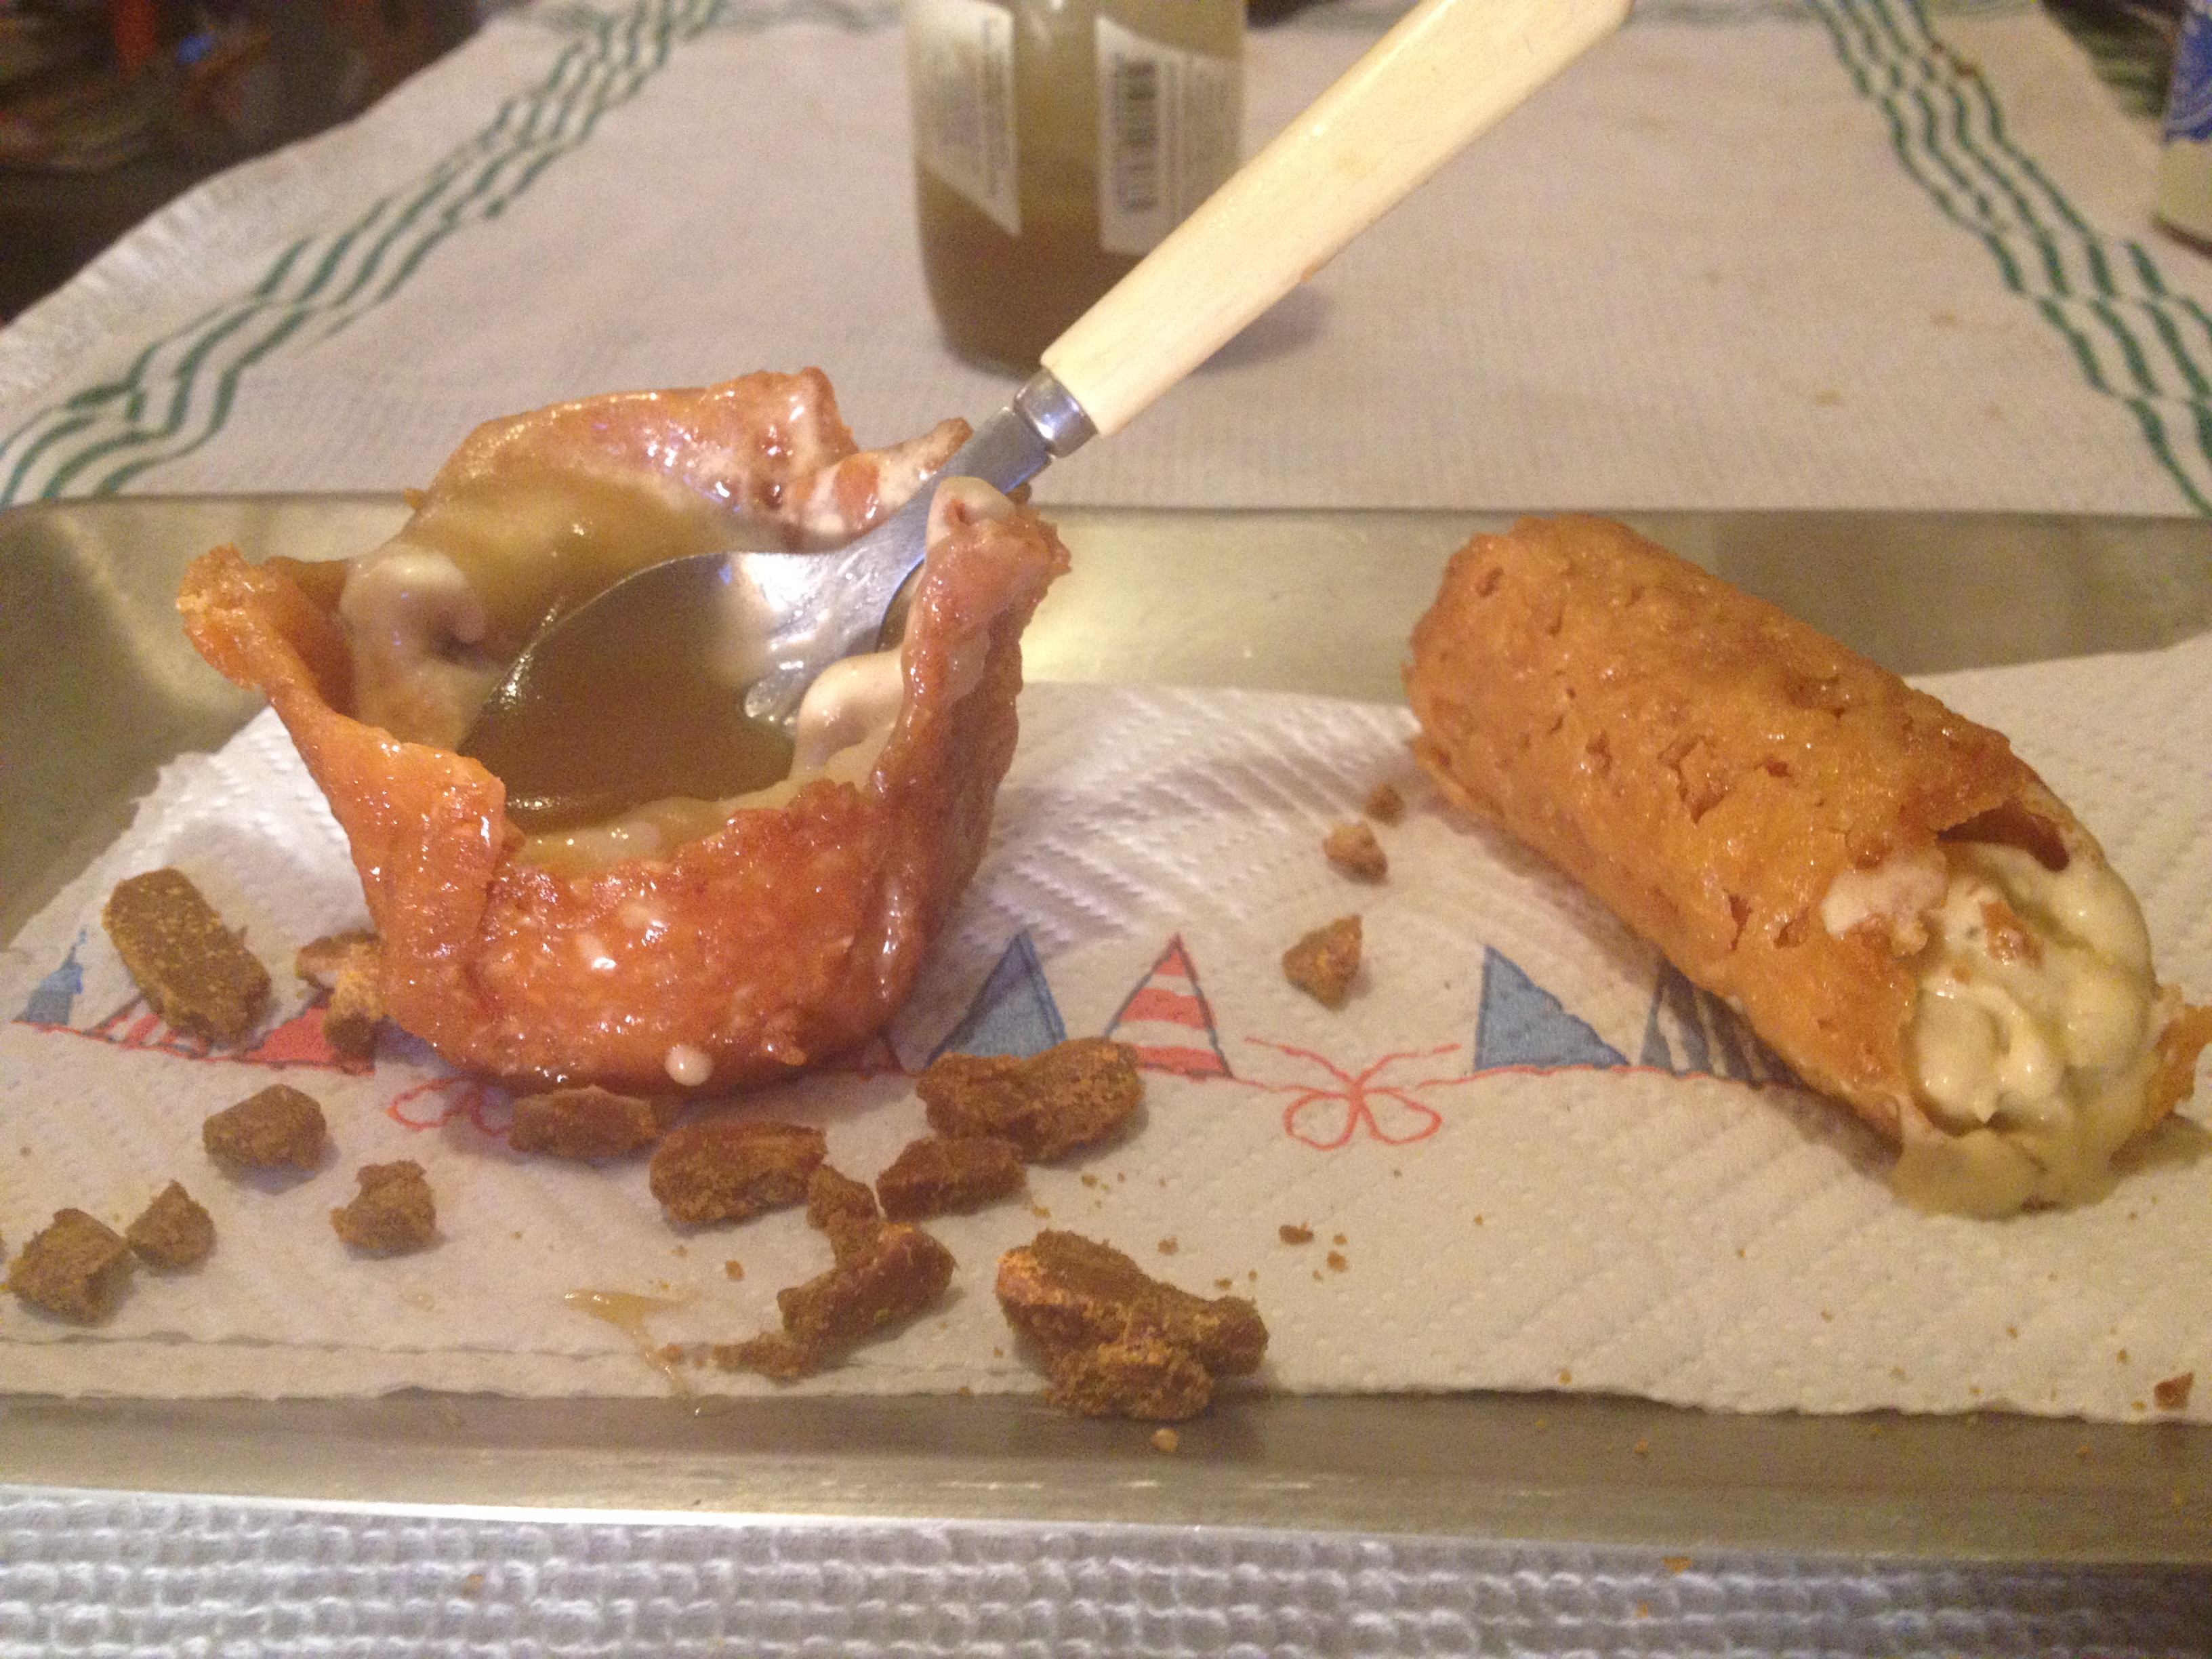
I added some extras to mine, naturally. And turned it into a banoffee ice cream dessert. To make the ice cream, I followed the same freeze-and-blitz concept, but also added cream and golden syrup to it, then pralined pecans – both to use up the last of the African pecans, and for the toffee element of the banoffee. The biscuit base was replaced by a biscuit basket laced with golden syrup. It held the ice cream well and never lost its crunchiness. The caramel sauce has a bit of coconut milk added to it, which made the dessert a bit more refreshing.
So I did use the oven after all. But the biscuits only take 8 minutes to bake, and I had a man handing me cocktails to help me cope by then.
I made 2 versions: ice cream served in the biscuit case, with sauce over it. This one works for me. I like my ice cream on the semi-melted side, so I warmed the sauce a tiny bit, which did just the trick. I also shaped the biscuits into tubes – like cannoli – and filled them with ice cream. No sauce.
This was my first attempt at tuille type biscuits. For a more sturdy base, I opted for brandy snaps – minus the brandy, plus coconut for the crunch. It is a little tricky, but a bit of patience – and in my case, 2 attempts – did the job. Despite the very buttery dough, I still had to grease the baking parchment, as on my first attempt it got hopelessly stuck to the biscuits. Either that, or it’s time to invest on a silicone baking mat.
 In the end, it all came together and we had a very cooling banoffee dessert to end a glorious weekend on a sweet note.
Banana Ice Cream In Crunchy Caramel Basket:
For the very creamy ice cream:
Or churn the ice cream manually, as I did: pour the cream into a sturdy container and place it in the freezer, uncovered. Leave it for 40 minutes, then remove it and whisk it very well until you have the same creamy consistency throughout. Take it back to the freezer and repeat this process 3 times.
6. Remove the ice cream from the freezer a few minutes before serving.
For the pecan pralines:
Biscuit case:
For the cannoli, use the same method, but wrap the hot dough around a whisk handle – or, more logically, a cannoli mould if you have one!
If the dough starts getting too cold and lose flexibility, place them in the oven again for just a few seconds until they’re soft enough again.
Coconut Caramel Sauce: